Luna User Guide
Introduction: Overview of LUNA Apps
LUNA has been designed to specifically monitor business processes at a granular level across the entire pathway, enabling rapid identification and analysis of underperformance, inefficiency, process integrity issues, operational bottlenecks, backlogs, and data quality issues. LUNA consists of several functional modules; this User Guide covers LUNA Pathfinder.
Accessing LUNA Pathfinder displays patient pathways – both Referral to Treatment (RTT) Active and Inactive – and non-pathway activity, arranged in time bands according to length of wait. These may be RTT pathways or other pathways, such as cancer referrals, which involve tracking patients under the hospital's care.
The application provides a set of tools for viewing the pathways and non-pathway activity (referred to hereafter as ‘pathways’), grouping them into logical sets called Cohorts, and for validating the records and peer reviewing the validations.
The data is extracted from the Trust’s Patient Administration System data, taken from the previous working day, and built into the database on LUNA Pathfinder. This is then sorted into the Cohorts.
Where possible the Cohorts are generated because of a logical hierarchy, which excludes certain sets of data in the following order, to refine the data which is included in the cohorts on the various PTLs:
- Exclusion of historic data which was validated and assured as inactive into Historic Exclusion Cohorts
- BAU Exclusions (national rules such as non-consultant-led activity and non-RTT-applicable specialties, e.g. Obstetrics)
- Trust Exclusions (local rules regarding data which should not be displayed on the PTL)
- PTL Cohorts (Incomplete RTT PTL, Planned PTL, Ongoing F/U PTL, etc.)
The excluded data is still available to be reviewed, dependent on the requested configuration. Full details of the Cohort logic, hierarchy and build sequence are available in a separate document.
Accessing LUNA Surveyor provides advanced pathway visualisation to remove the need for manual data validation and significantly reduce costs.
Pathway information from multiple sources is assembled in the LUNA data model including core elective patient activity, diagnostics, and clinical documentation. In many cases this pathway information contains inconsistencies and other data quality errors that diminish the accuracy and integrity of the pathway.
Surveyor presents detailed pathway information using advanced visualisation to provide an intuitive insight into the content and context of pathway activities. Using logic-based rules from LUNA Pathfinder , LUNA Surveyor highlights data quality errors and inconsistencies in pathways, such as illogical RTT status sequences. Users can see all identified errors within the context of the pathway at a glance and assess the impact of these errors on the accuracy and integrity of the pathway.
Confidence levels can be automatically applied to pathways, based on the volume and severity of the data quality errors, to inform prioritization of cohorts of pathways that need validation.
LUNA Rova uses Artificial Intelligence-based machine reading technology to analyse the content of clinical documentation. A Natural Language Processing engine uses unique algorithms to identify key phrases and attributes, such as dates, specialties, symptoms, conditions etc., within the document content. LUNA Rova then classifies clinical documents based on the analysis. For example, an outpatient clinic letter may be classified by LUNA Rova as a discharge letter based on an English language phrase within the letter content.
LUNA Surveyor also allows users to comment on the phrases and associated classifications identified by Rova to assure them, or if necessary, to propose alternative classifications.
There is also functionality to allow users to highlight document text and phrases and recommend for them to be added to the LUNA Rova classification engine algorithm, thereby training it to recognise them in the future. Any changes to the phrases in the algorithms are fully tested before being released.
Accessing LUNA Pathfinder
User Login
Use your browser to access LUNA Pathfinder. A link to the application will be provided to you, either on the Trust intranet or by your manager.
You will be automatically logged into LUNA Pathfinder if you are logged into your M365 account on the Trust network. You can only access LUNA Pathfinder if you are logged into a Trust workstation/laptop or using a Trust-approved remote access method.
You cannot access LUNA Pathfinder from home on the internet without a VPN or other remote access into the Trust network.
User Roles
Every User in the system is assigned a User Role. User Roles are granted permission to perform specific Role Actions.
All User Roles can view the Dashboard. Specific actions such as viewing a list of pathways or recording a validation are limited to certain User Roles.
If you require elevated access, please contact a Trust LUNA Pathfinder Manager who can update your User Role.
Troubleshooting Access
If you require access to the system but are unable to access it, either because your username and password are not recognised, or an error message is displayed when you click on the link, please contact a LUNA Pathfinder Manager so that they can ensure that your account is set up correctly.
LUNA Pathfinder Navigation
When you log into the system and select Pathfinder on the landing page, the screen which is first displayed is the main LUNA Pathfinder Dashboard, showing a grid of all pathways in the default View.
Top Navbar

The top navbar contains the following items:
Build and Census Date
The Build Date and Census Date (Census Date refers to the date the information was taken from Trust systems).
Dashboard Button
Click on the Dashboard button to return to the Dashboard view.
Search by ID Button

The ID Search Bar is used to open a Worklist containing all pathways for a specific patient. Click on the search button to open it.

You can search by MRN (hospital number), PTL Unique ID, Pathway ID, or NHS Number.
Select an ID type from the dropdown menu, enter the ID in the search bar, and click Search.
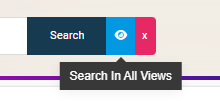
The button with the eye icon toggles between searching for pathways on all views or returning only pathways which match the current View (e.g. the Incomplete RTT PTL).
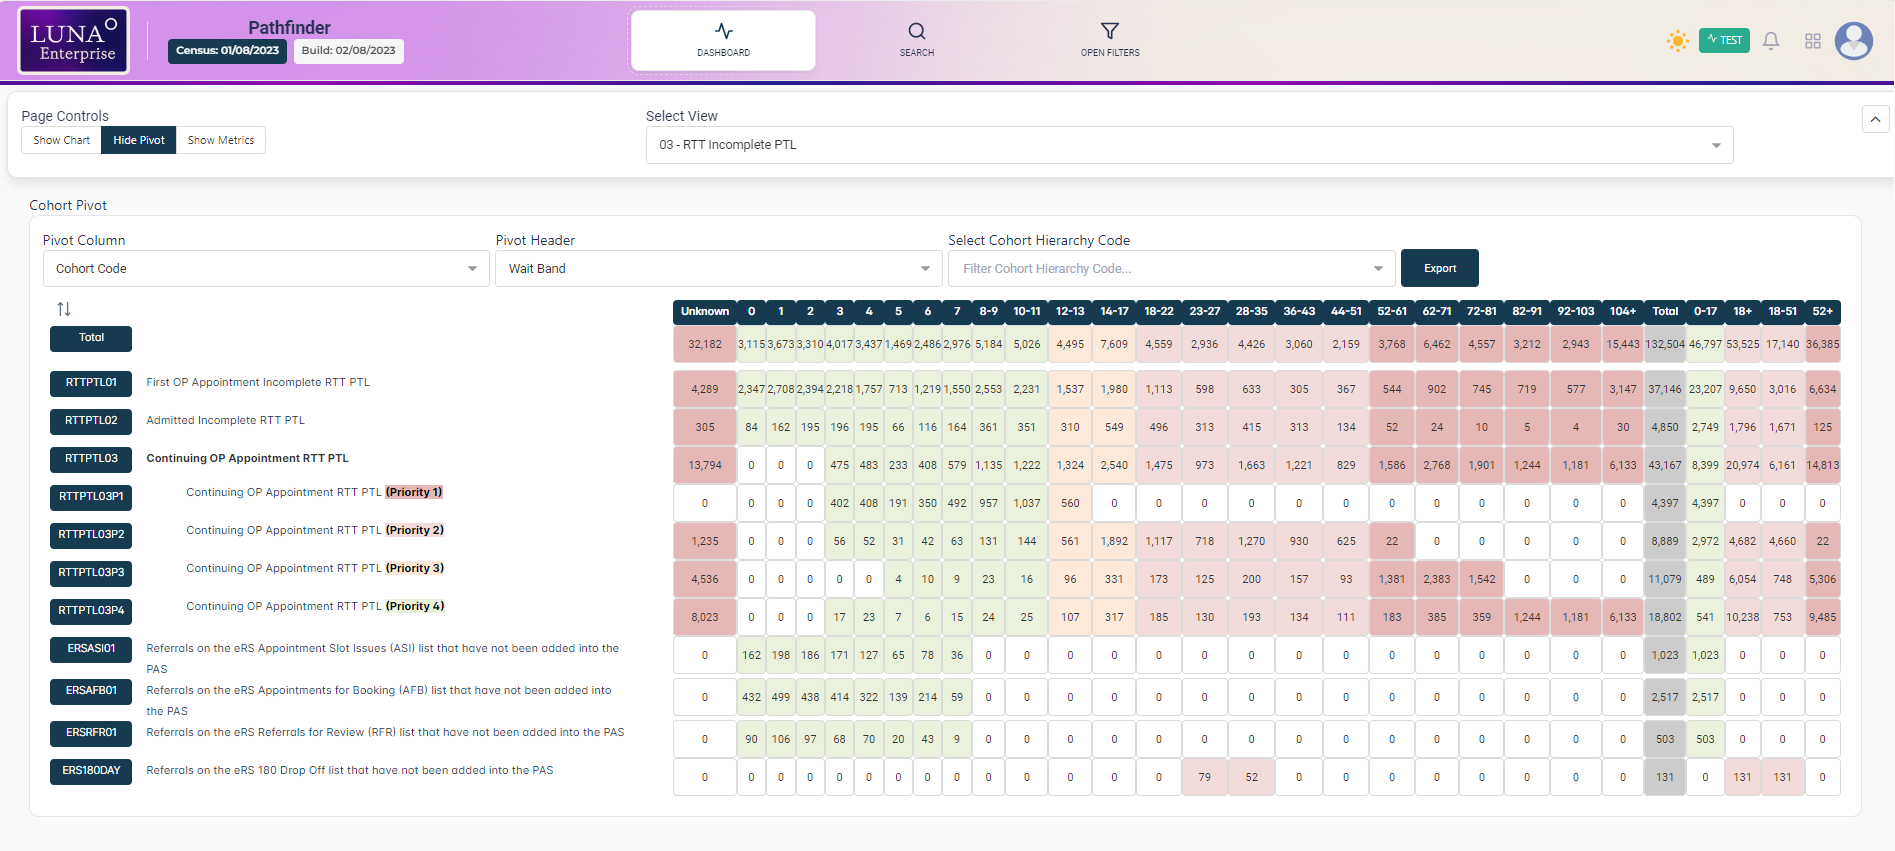
The pathway counts are split into cohorts and arranged on the Cohort Pivot Grid.
See the workflow for Searching for Pathways by ID for more information.
Open Filters Button
The entire cohort grid can be filtered using multi-select Operational Filters. Click on the Open Filters button to open the Filters panel.

Dark/Light Mode Button

Click on the Dark/Light Mode button to toggle between the two modes.
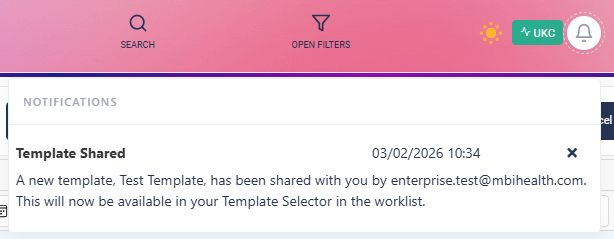
Notifications Button

You will see a flashing red dot if there are any new info notifications. Click on the Notifications button to view them.
Activity Panel Button
Click the Activity Panel button to open the Activity Panel.

User Profile Panel
Click the User Profile Panel button to open the Profile Section Menu.

Dashboard Bar

The collapsable Dashboard bar contains the following controls:
Page controls
You can show or hide the Cohort Chart, Cohort Pivot Grid, Cohort Hierarchy Chart, and Metrics by clicking on the buttons.
Select View

Use the Views dropdown menu to choose which group of cohorts to display in the Cohort Pivot Grid.
Cohort Pivot Grid
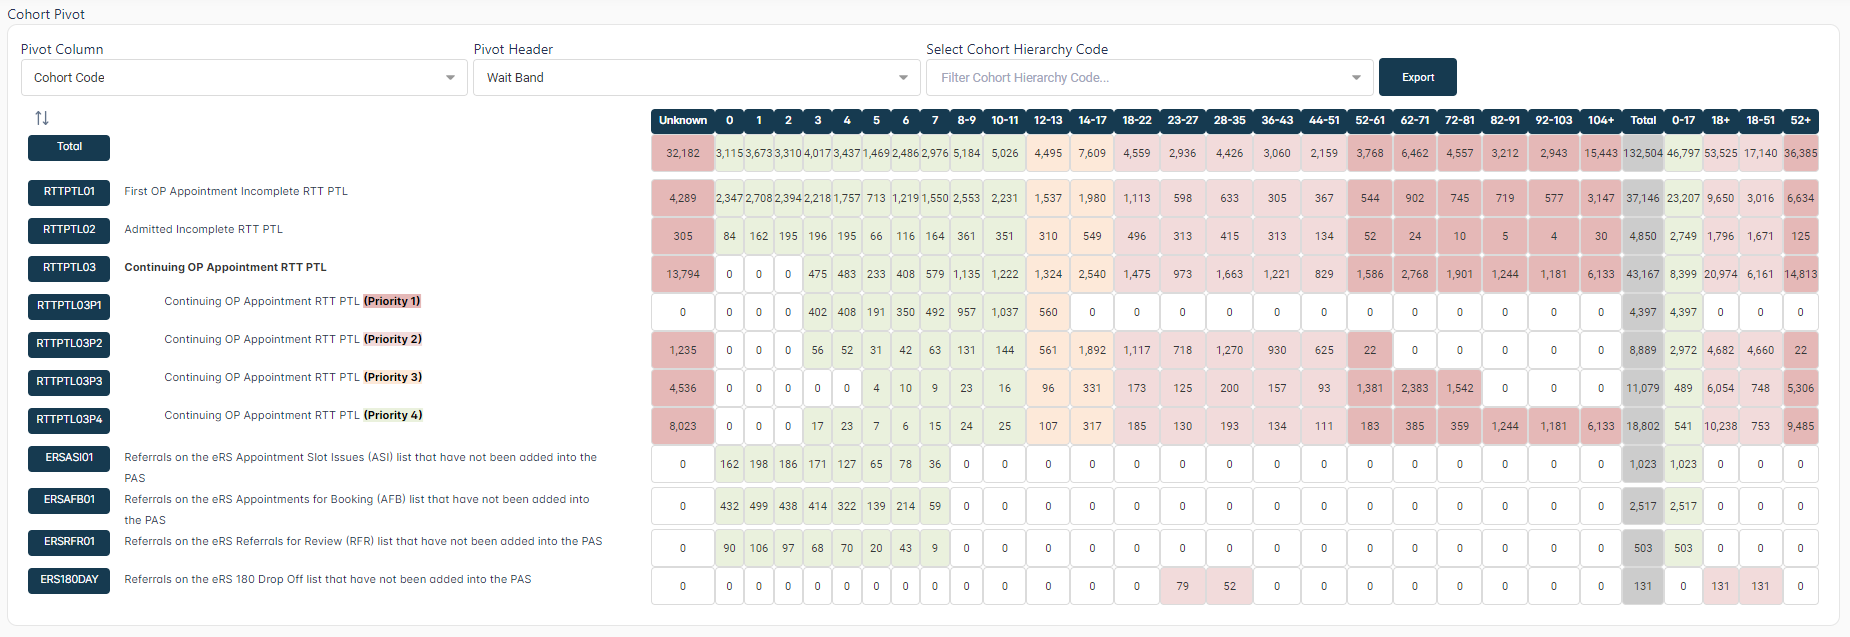
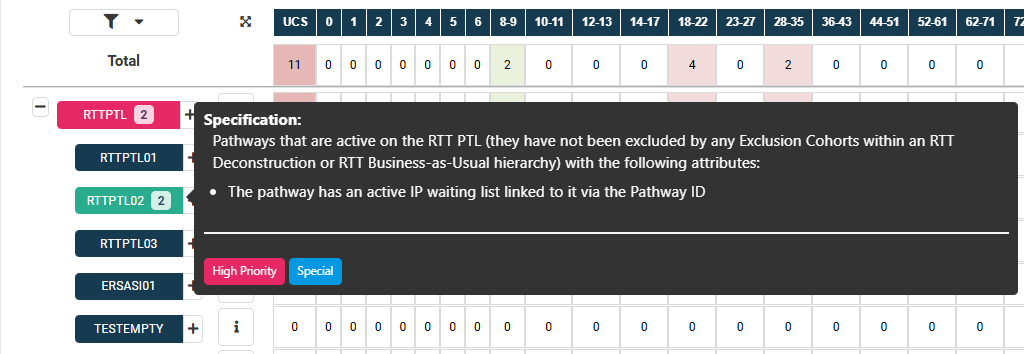
The Cohort Pivot Grid is the main tool for dividing pathways into logical groups called Cohorts. The cohorts are divided into time bands (Weeks Waited). The numbers in the grid represent the number of pathways in the Cohort for each time band. The filters interact with the grid to filter the numbers displayed in the grid.
Waiting time bands

The wait time bands show how many pathways have waited a certain number of weeks, unless otherwise specified in the header.
Depending on configuration of the active View , this could indicate:
- The time since the referral, excluding clock stops
- The time since the referral, including clock stops
- The System Weeks Waited
In all cases, the calculations are made based on the data in the Trust Patient Administration System.
The first column represents records with an unknown wait time.
Weeks Waited summary columns

The default Weeks Waited summary columns sum the totals from the grid against national reporting requirements. These can be found on the right-hand side of the grid, to the right of the Total column.
Cohorts

The grid is divided into Cohorts to make it easier to view and analyse subsets of data.
Cohort Pivot Grid Numbers

The individual numbers within the grid represent the number of pathways reported for the cohort during the associated weeks waited time band.
Clicking on the number loads the Worklist for the cohort in this time band. The Worklist will show all the records which constitute the number. Refer to the Worklists section for more information on the Worklist view.
Each column in the grid can be configured to show a colour for all numbers in that column to help highlight where the higher priority pathways are.
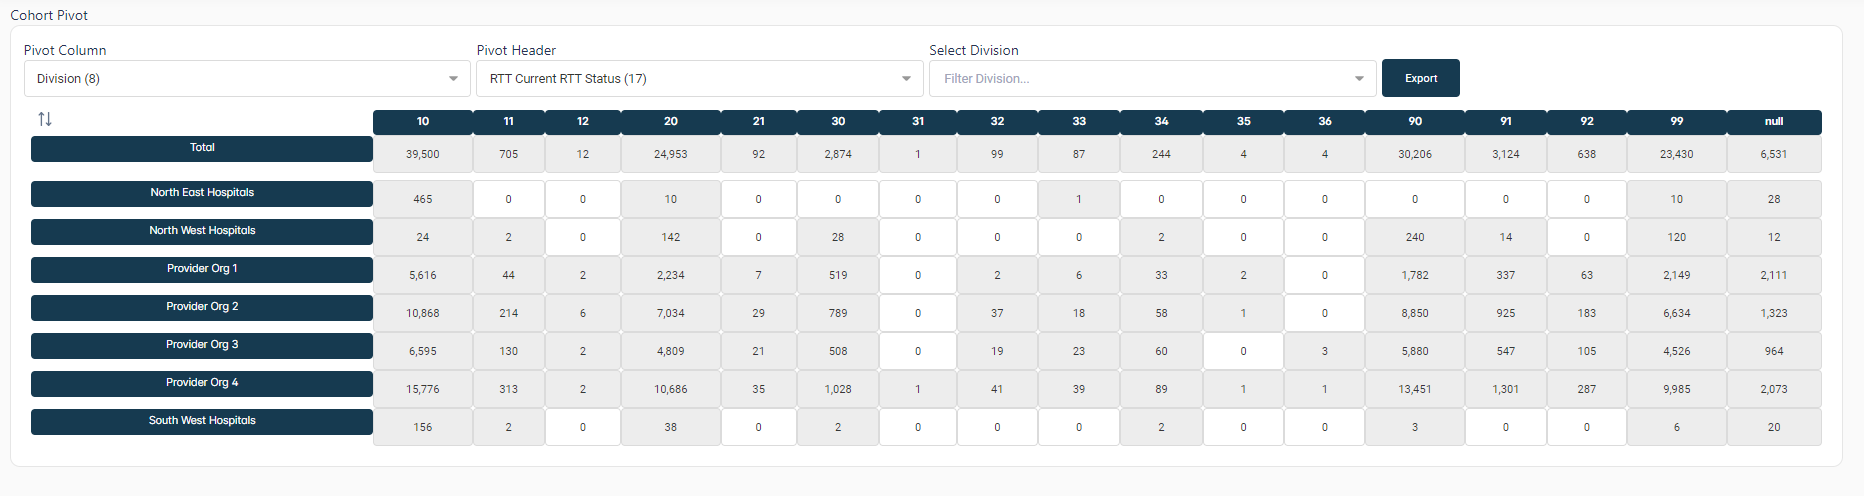
It is possible to pivot the grid by any column in the dataset. It works in a similar way to Excel's pivot functionality except the data can be split and drilled down into directly in LUNA.
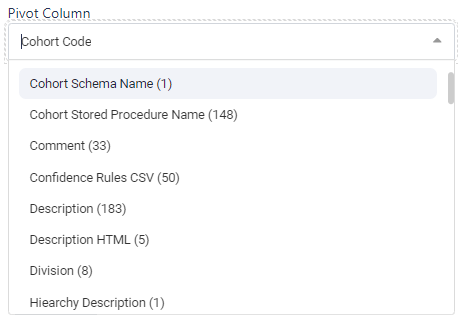
You can change the Pivot Column or Pivot Header by any field available in the dataset. It also shows how many unique values are present in the whole dataset for each field.
Pivot Column Menu
The Pivot Column dropdown menu allows you to split the data in the first column. You usually split this by columns that have around 5-10 options.
This defaults to Cohort Code.
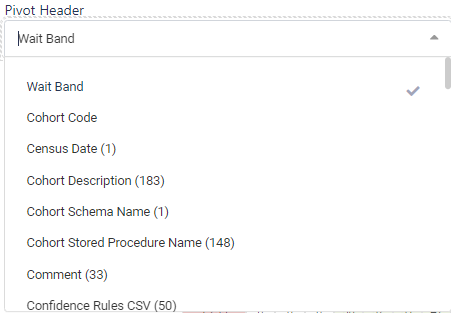
Pivot Header Menu
The Pivot Header dropdown menu allows you to select a category for the grid's headers, used for columns with a higher number of unique values.
This defaults to Wait Band.
For example, if you select Division from the Pivot Column dropdown, and Current RTT Status from the Pivot Header:
Pivot Drilldown Menu
Hover over the + icon in any pivot row to show the drilldown menu. This allows you to drill down into that row's data by any available field.

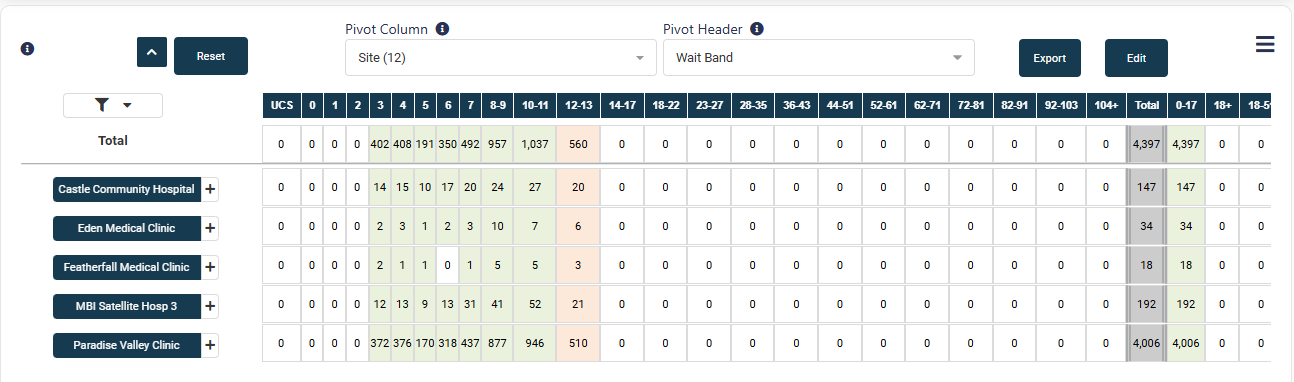
You can continue drilling down into the data as many times as needed.
Click the Up button to go back up a level, or the Reset button to return to the original pivot view.
Pivot Row Filter
Click the pivot Filter button to open the row filter menu. Individual pivot rows can be selected for display. The button will have an amber colour when a row or rows are selected. The filter can be cleared by clicking the Clear Selections button.
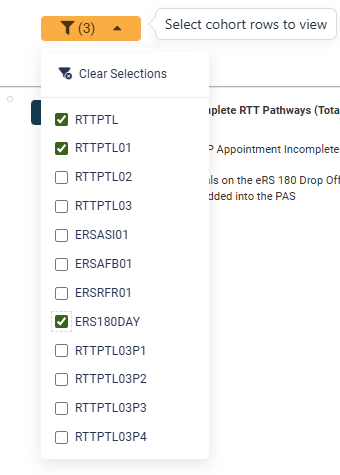
Note: row selections made here are also applied to the Cohort Chart.
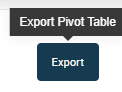
Export Pivot Data
Click the Export button to export the current pivot data to a CSV file.
Pivot Options Menu
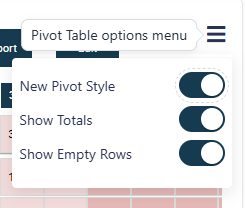
Click the hamburger button at the top right of the pivot table to open the pivot options menu. This contains the following options:
- New or Classic pivot styling.
- Show or hide the Totals row.
- Show or hide empty rows.
Pivot Colours and tags
Cohorts can be assigned colours and tags to help visually identify them in the pivot table and cohort chart. These can be set in the View Definition configuration by a LUNA Pathfinder Administrator.
Cohort Chart
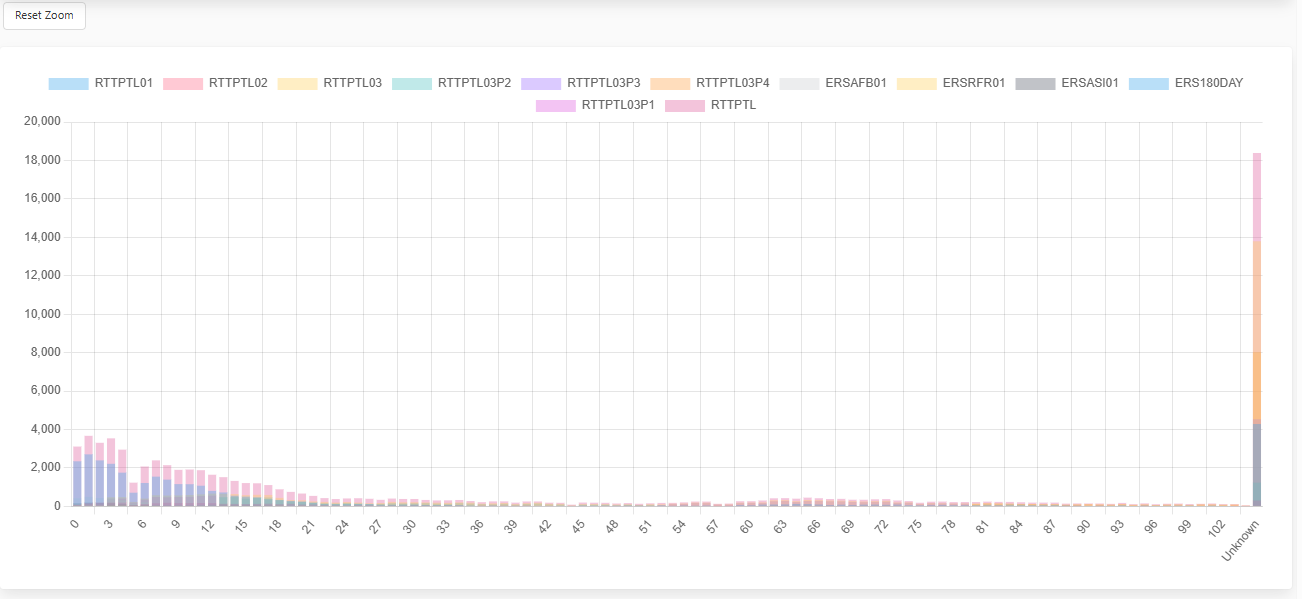
This chart provides a visual representation of the data in the Cohort Pivot Grid. It is interactive and responds to changes made in the grid and the Filters. As in the Cohort Pivot Grid, clicking on a bar will load the relevant Worklist.
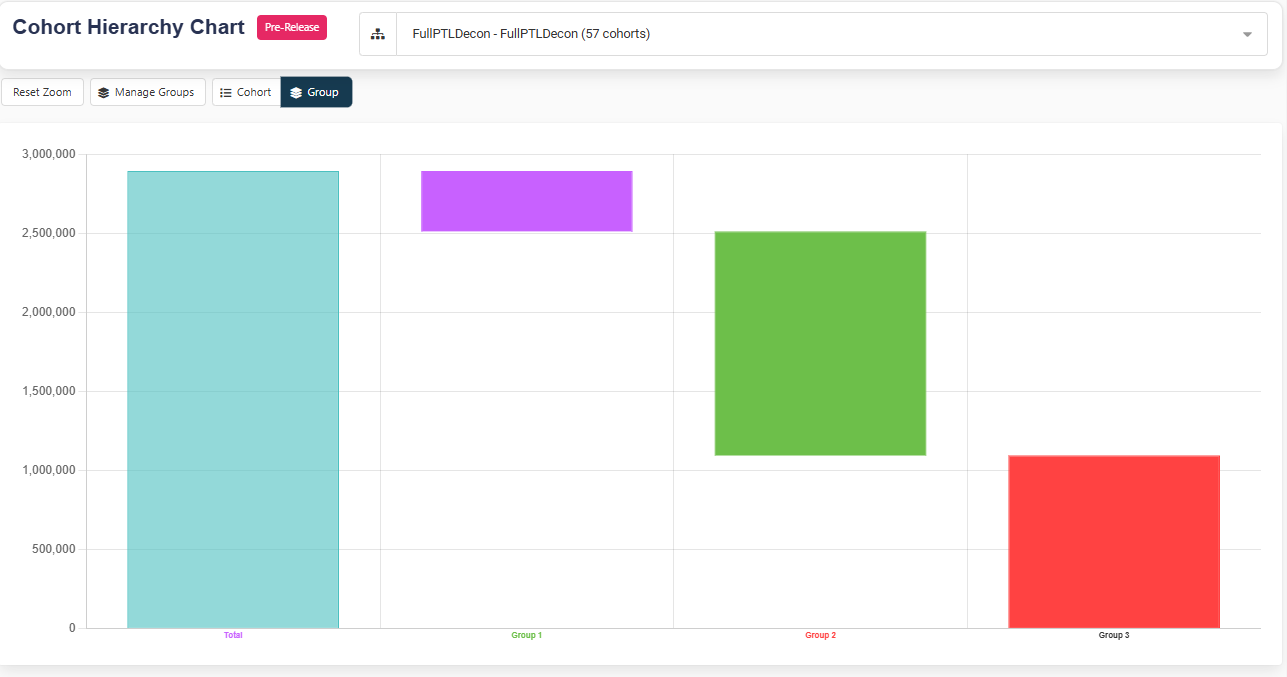
Cohort Hierarchy Chart
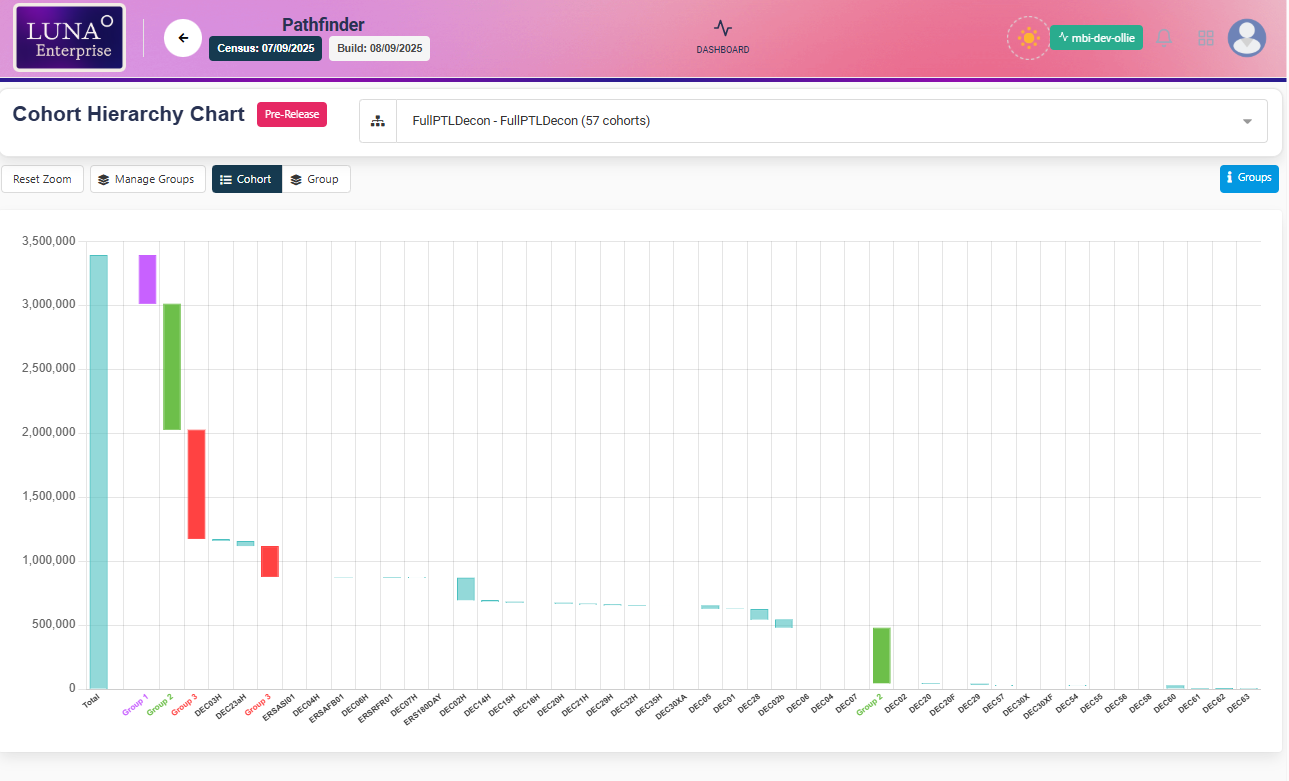
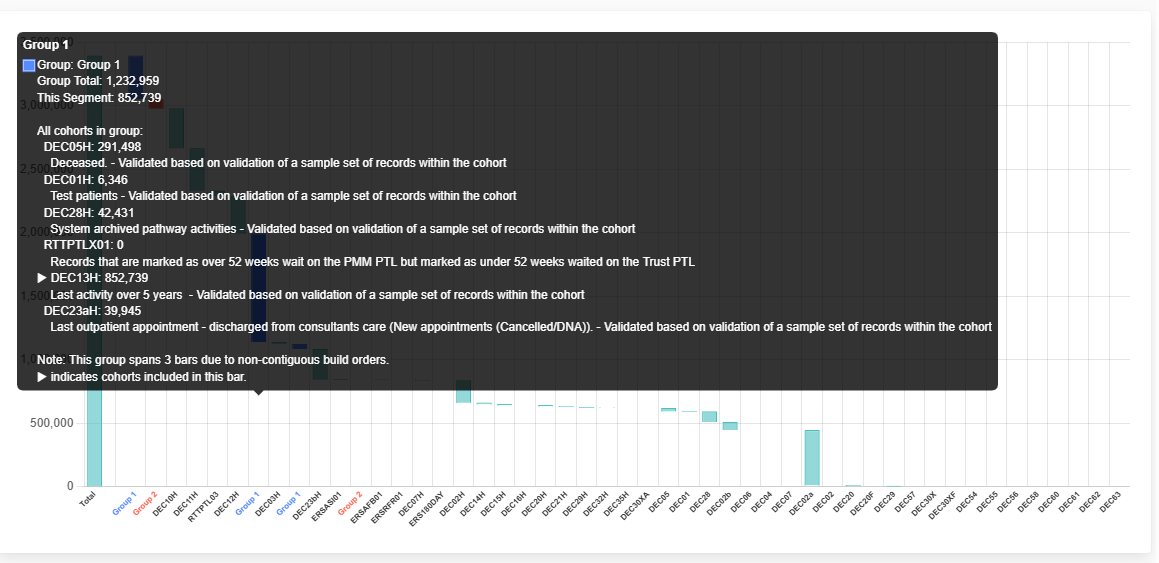
The Cohort Hierarchy Chart provides a visual representation of the cohort hierarchy of the selected view.
Detailed information about the cohorts and groups can be seen by hovering over the bars in the chart.
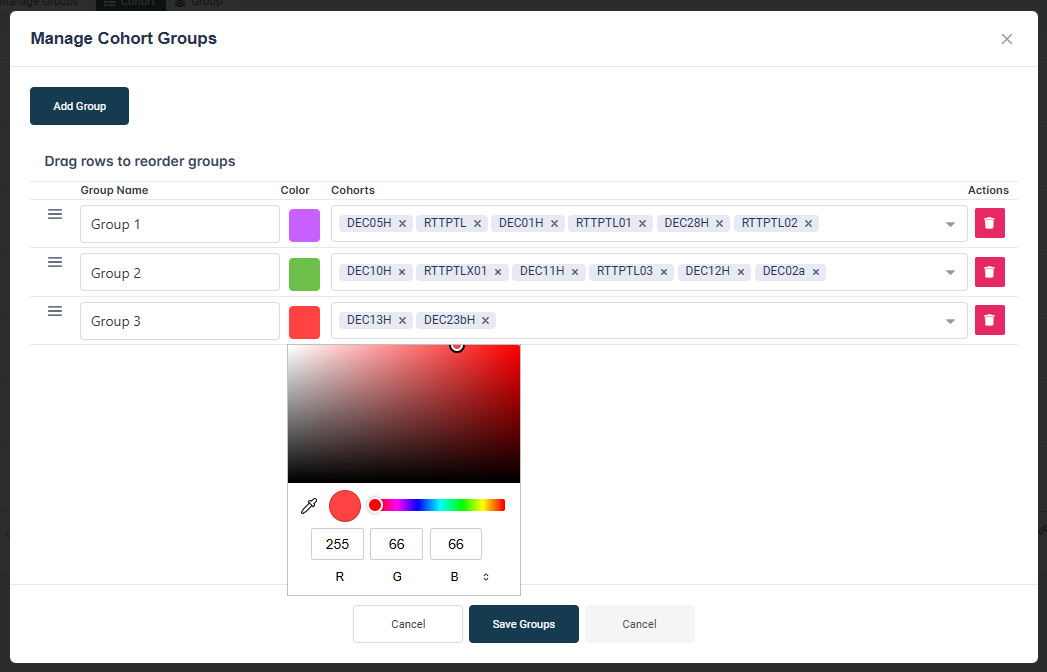
Cohorts can be grouped in the hierarchy chart via a modal interface:
- The user can select a group name and colour.
- Group labels at the base of the chart are highlighted with the chosen group colour.
- Group order can be changed by dragging and dropping the groups in the table, using the handles at the left of each row.
The chart can be switched between Cohort and Group modes.
Cohort Mode
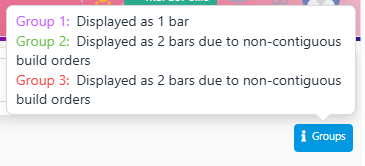
This mode displays all the hierarchy's cohorts, and the groups created by the user. The build order is preserved, so if a group comprises cohorts with non-contiguous build orders, it will display as separate bars in the correct positions when in Cohort mode.
In Cohort mode, additional groups info is shown in a tooltip when the group info tag is hovered over.
Group Mode
In this mode, only the groups that you have created are shown in the chart.
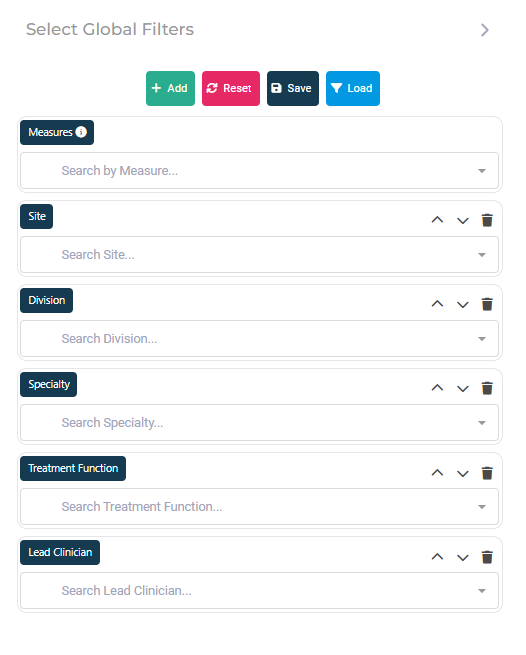
Filters Panel

Click the Open Filters button to open the Filters side panel. These filters allow you to constrain the data on the Cohort Pivot Grid and Worklist. The preset filters are:
- Measures (pre-defined filters combinations based on one or more columns)
- Trust Site
- Division
- Latest Specialty
- Latest Treatment Function
- Consultant
Combinations of more than one Operational Filter can be used to further constrain the data (e.g. to display only data for a specific Specialty and Consultant).
Adding Filters
Additional filters can also be added. These filters can be based on any field in the system and can be used to further refine the data displayed in the Cohort Pivot Grid and Worklist.
Click the Add Filter button to add a new filter.

Select the field to filter by, then click Add Selected Filter
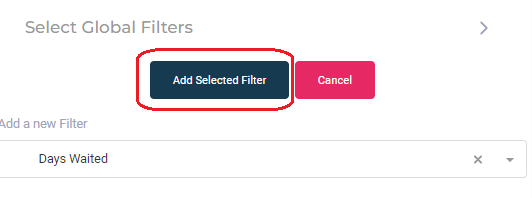
The filters can be re-ordered on the panel by means of the up and down arrows.
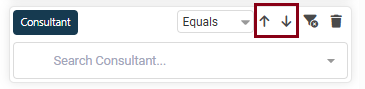
Advanced Filter Options
Each filter has advanced options which can be accessed via a dropdown menu.
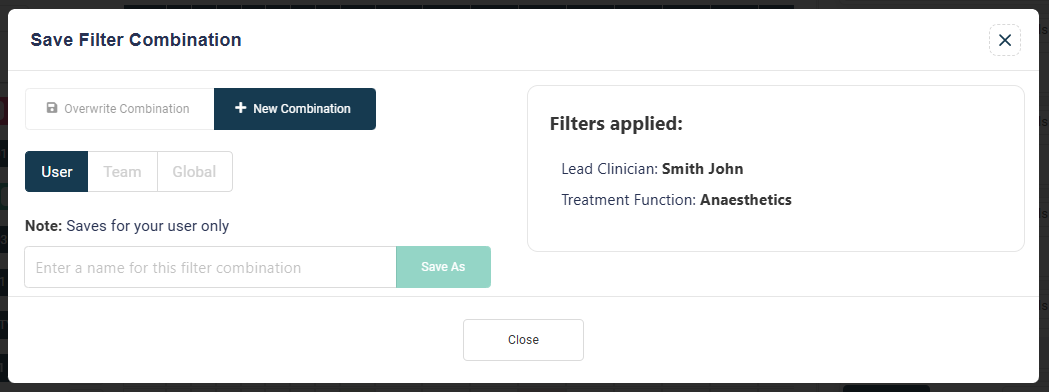
Custom Filter Combinations
Filter combinations can be saved with a custom name for future use by clicking the Save button. Saved filter combinations can be accessed by clicking the Load button.
Activity Panel
The Activity Panel provides handy shortcuts to access team members, shared Worklists and Validations.
Team
View your team members and their contact details.
Shared Worklists
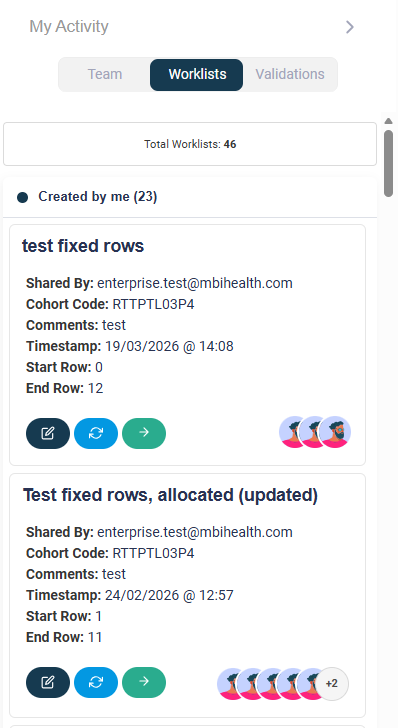
The Worklists tab in the Activity Panel shows all shared worklists available to you. Worklists are grouped into three collapsible sections:
- Created by me — worklists you have shared
- Assigned to me — worklists shared directly with you by another user
- Global — other shared worklists that you have access to
A button at the top of the tab shows the total number of shared worklists and, when clicked, opens the Shared Worklists management page.
The validation progress of each shared worklist is displayed on its card. Click the Refresh button to update the progress.
Click the View (arrow) button to open the worklist in Pathfinder.
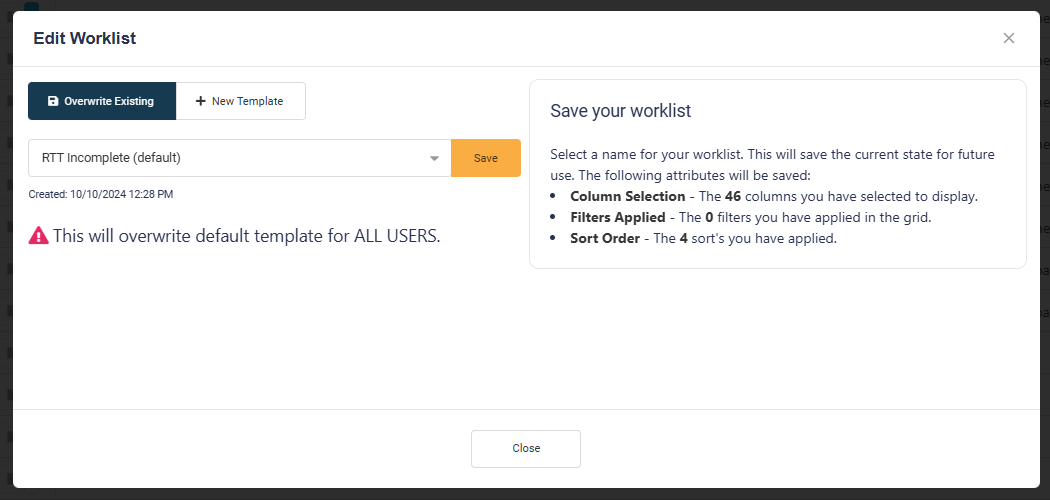
Click the Edit (pencil) button on a worklist card to open the Edit Worklist modal.
Editing a Worklist
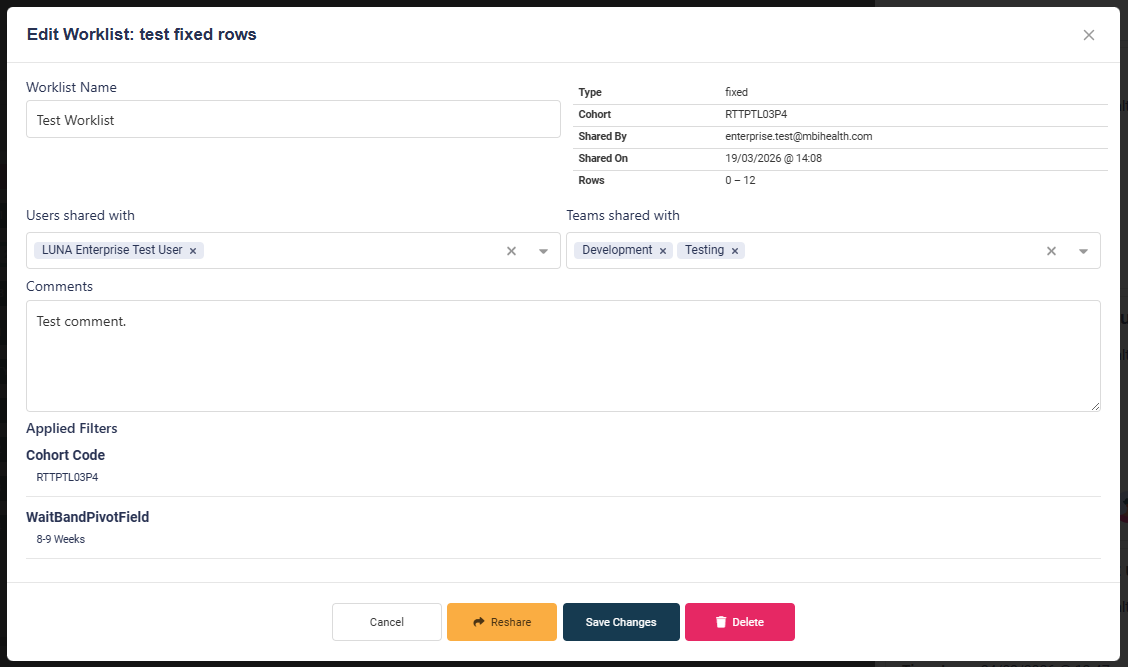
The Edit Worklist modal can also be accessed from the Shared Worklists Manager page.
The modal displays read-only details at a glance - Type, Cohort, Shared By, Shared On, Row Range and Filters Applied - alongside the following editable fields:
- Worklist Name — rename the worklist
- Users shared with — add or remove individual users
- Teams shared with — add or remove teams (available to users with the required role)
- Comments — update the worklist description or notes
Click Save Changes to apply your edits.
Resharing a Worklist
For fixed-row worklists, a Reshare button is available in the modal. Clicking it creates a new copy of the worklist (appended with "(Reshared)") and shares it with the same users and teams.
Deleting a Worklist
Click the Delete button in the Edit Worklist modal to permanently delete the worklist. A confirmation prompt will appear before any action is taken.
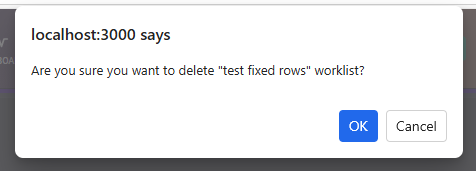
Note: Managers and Supervisors can only delete worklists they have shared themselves. Admins can delete any worklist. This action cannot be undone.
Validations
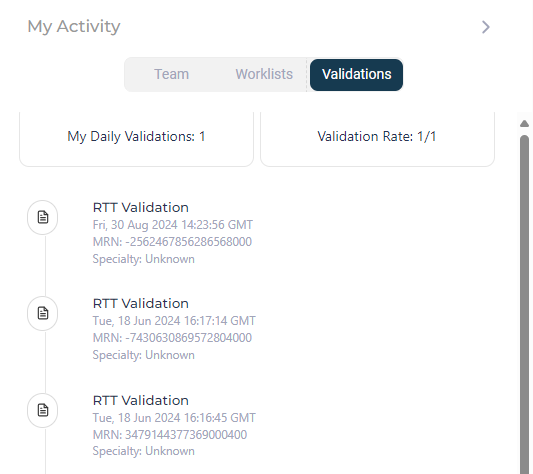
Here you can view a summary of your validations. Click the View button to edit a validation.

The number of your daily validations is displayed at the top of the panel.
Worklists
The Worklist view can be accessed by:
- Clicking on a number in the Cohort Pivot Grid while in the Dashboard view.
- Using the ID Search bar to generate a worklist of pathways and non-pathway activity for a specific search criterion.
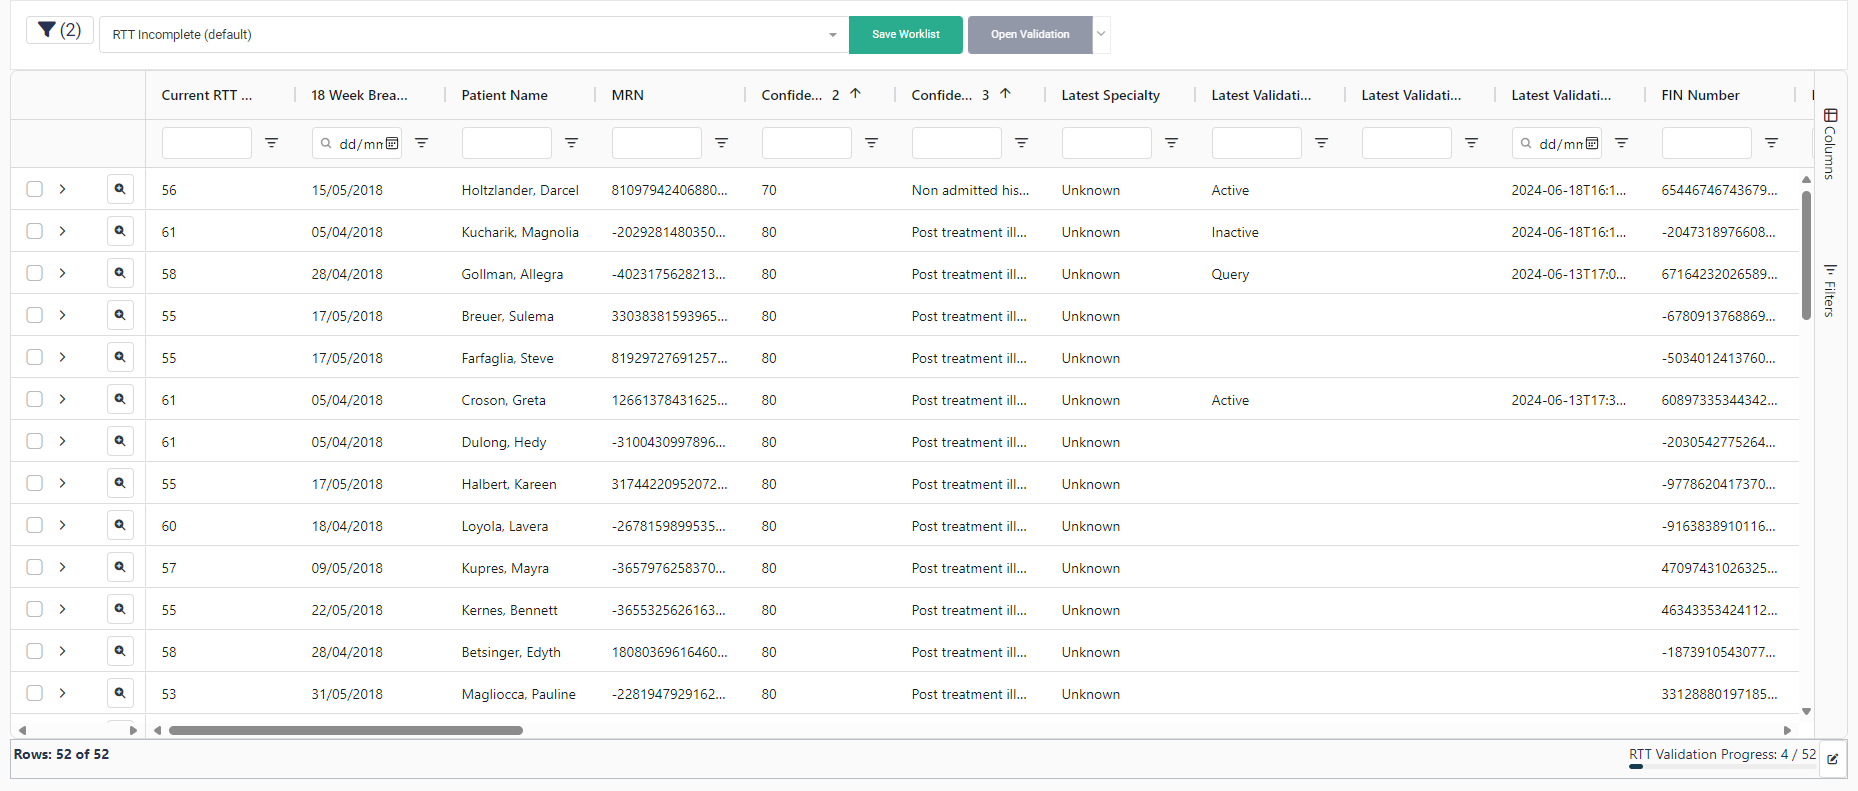
Clicking on a total in the cohort grid loads a Worklist. This is a list showing key information about the Patient, the Pathway, and the Latest Validation (if applicable) for the record.
Searching for a patient by ID using the ID Search will load a Worklist of all that patient’s records.
Note: If you wish to change the view, return to the Dashboard, re-select the View required, then open a Worklist from the View.
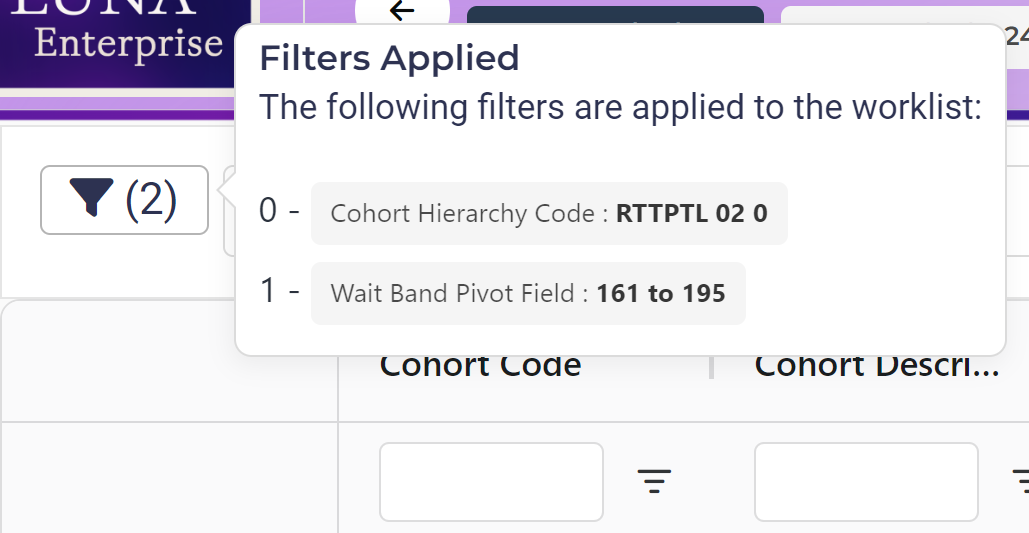
Filters Applied
You can see the list of filters currently applied to the worklist after you drill down by hovering over the Filter icon.
Template Selector
Use the Templates dropdown menu to apply a different template to the data in the Worklist grid.

This affects which columns are displayed, and the order in which they are displayed. New Templates can be created, if necessary, by LUNA Pathfinder Managers, using the Save Template button. Regardless of the Template used, the pathways loaded will be the same pathways, and the same number. Only the column headers, data and ordering will differ.
Using Filters in the Worklist
The Filters can be used from within the Worklist view, in the same manner as when viewing the Dashboard, to constrain the data displayed in the Worklist. To remove filters and display all data in the Worklist, click the Reset button on the Filters Panel.
Column Headers
The columns displayed show all the relevant information about the patient, pathway, and validation status. Different Views and Cohorts may be configured to display different sets of columns.
Click on any column header to sort the Worklist by that column. Clicking once sorts from A-Z (or earliest to latest for date columns). Clicking again sorts from Z-A (or latest to earliest for dates).
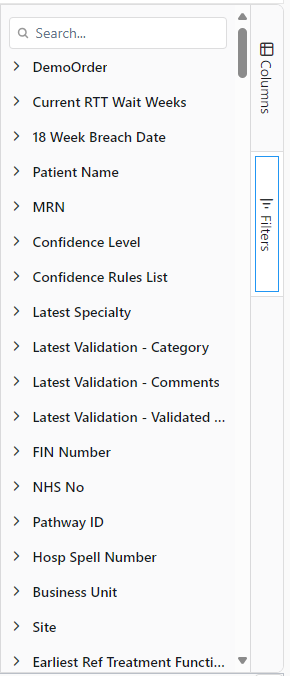
Column Visibility
Click on the Columns button on the right of the grid to open the Columns tool panel. This can be used to select which columns are displayed.
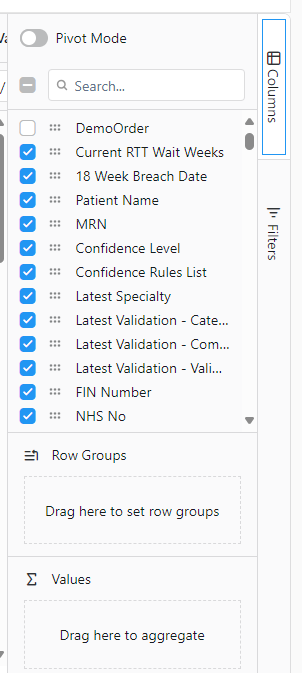
Note: this will only take effect for your current session. If you are frequently removing the same columns, you can save your column settings in a template.
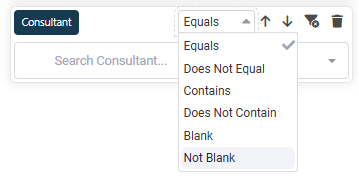
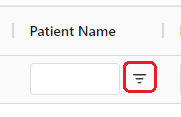
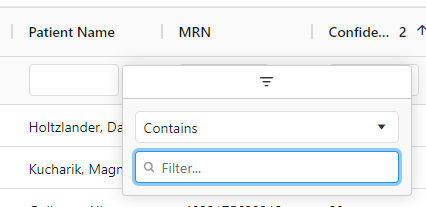
Column Filters
To refine the results displayed in the worklist, enter a full or partial search term in the filter text box, or click on the Filter icon and select the appropriate filter to apply (e.g. Contains, Ends With or Equals the text entered).
Column filters can also be configured via the Filters tool panel. Click on the Filters button on the right of the grid to open the Filters tool panel.
Column Date Filters
Columns containing dates will have a calendar icon adjacent to the Filter button. This can be used to select a specific date to use for filtering (e.g. all pathways before/after the selected date). Alternately, the date can be typed into the search bar (but must be in the format DD/MM/YYYY).
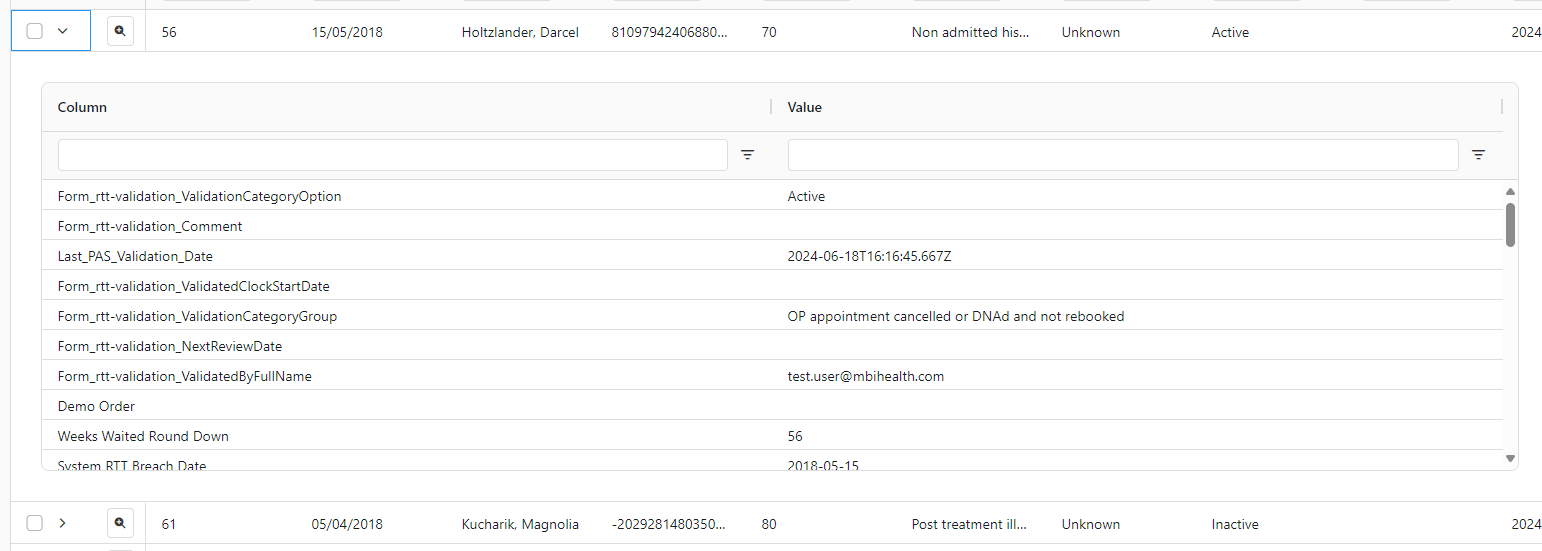
Expanding a Row
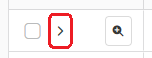
Click on the arrow icon on the left-hand side of the worklist row to display a vertical table of all Worklist columns for that row. This makes it easier to identify key information about the pathway without the need for horizontal scrolling. Click on the icon again to collapse the table and return to the grid view.
Worklist Validation Form
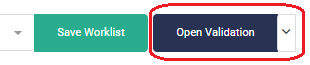
Selecting a row by clicking on it, and then clicking the Open Validation button, will open a Validation form, which will also contain the relevant Submission History.
A dropdown menu attached to the right of the button allows you to select a specific validation form.
Double-clicking a row in the Worklist will open the last form selected, or the default RTT Validation form.
Validation Form
Validation Progress
You can track validation progress on a worklist using the progress bar on the bottom right of the worklist.
This allows you to track the validation progress of a form for a worklist.

For a detailed description of the validation process, see the Validation Workflow.
Worklist Row Status Button (beta)
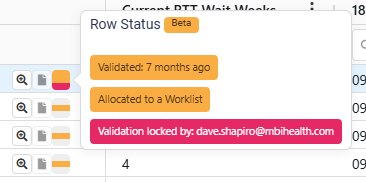
The Row Status button on the left of each worklist row indicates the current status of the pathway. When hovered over, a tooltip displays the pathway's validation, allocation, and pathway lock status.
Accessing LUNA Surveyor in the Worklist
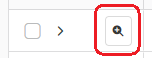
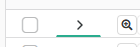
Clicking the Magnifying Glass icon will open LUNA Surveyor within Pathfinder, displaying the selected pathway in a visual format.
Use the Previous and Next buttons to navigate the Worklist pathways.
Click the Copy URL button to copy the URL of the pathway to the clipboard.
The row currently being viewed is displayed.

Viewing latest document in Worklist (beta)

You can open the latest document in the worklist by clicking on the document icon next to the surveyor magnifying glass.
This will open a modal with the latest document for the pathway.
You can also view this in the validation window by clicking the View Document button.
Worklist Comments (beta)
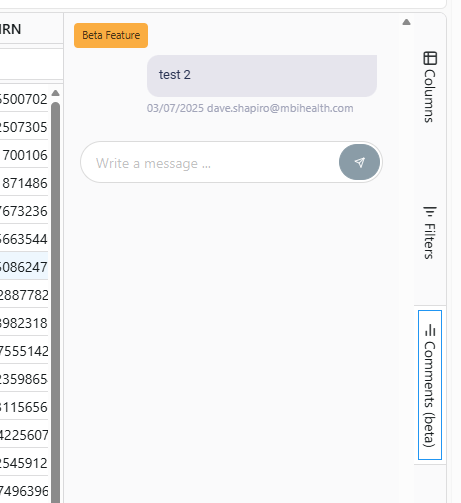
You can leave comments for other users on individual worklist rows. Click the comments button on the right hand side of the worklist to open the comments panel.
You can see all comments left for the pathway, along with the username and timestamp.
Rows with comments will show a green highlight to the left of the row.
Worklist Context Menu
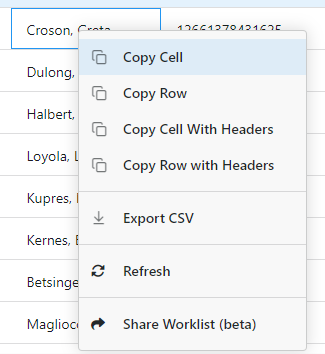
Right-clicking on a row in the Worklist will open a context menu with the following options:
- Copy Cell will copy only the selected cell to the clipboard.
- Copy Row will copy the entire row to the clipboard.
- Copy Cell with Headers will copy the selected cell with the column header to the clipboard.
- Copy Row with Headers will copy the entire row with the column headers to the clipboard.
- Export CSV will export the entire Worklist to a CSV file.
- Refresh will refresh the Worklist.
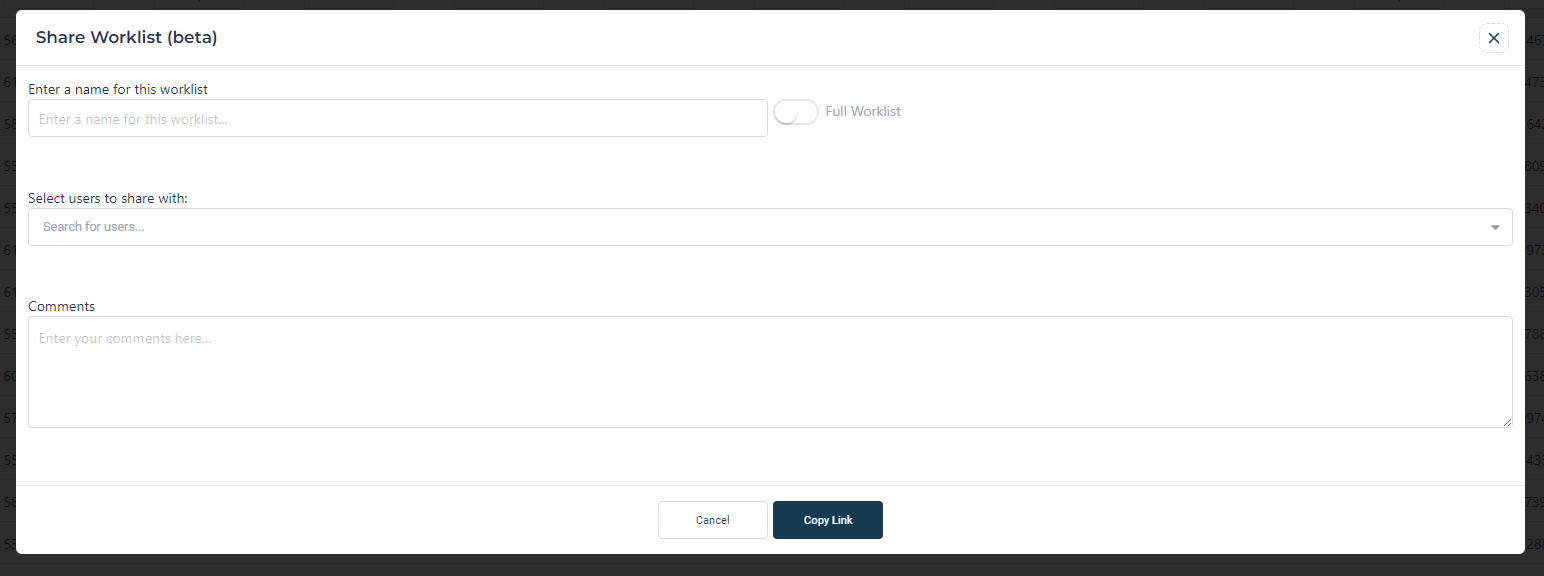
- Share Worklist (beta) will open a modal to share the Worklist with another user. For a detailed description, see the workflow for Sharing a Worklist.
Templates
Custom templates can be saved to define which columns are displayed in the Worklist, and in what order, as well as any filters applied to the Worklist.
For a detailed description of creating and managing templates, see the workflow for Creating a Custom Template.
Validation
Navigating to Worklist View
To begin the validation process, it is necessary to navigate to a Worklist view (i.e. a Pathway Grid must be displayed on the system). The Worklist view can be accessed by:
- Clicking on a number in the Cohort Pivot Grid while in the Dashboard view
- Using the ID Search to generate a worklist of pathways for a specific patient
Opening a Validation Form
Once the record to be validated has been identified, select a row by clicking on it, and then click the Open Validation button to open a Validation Form or by double clicking on the row. If you double click, it will load the currently selected form from the form list, or the default form.
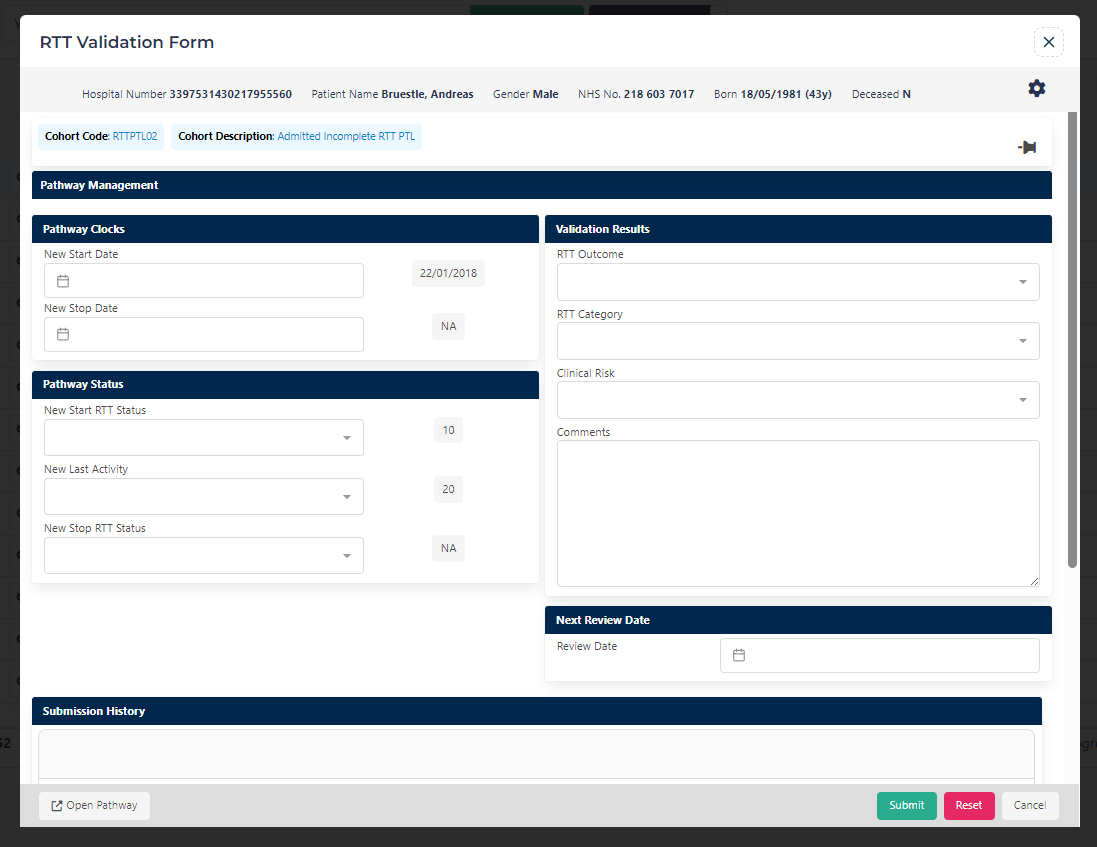
The RTT Validation Form
Note: when you first open the Validation Form, if the pathway has previously been validated, many of these fields will already be filled in with the findings of the previous validation. These fields can be deleted or overwritten, as a permanent record of the previous validation will be saved in the LUNA Pathfinder Submission History. Changing the validation will never update the previous validation but will move it to the Validation History and create a new Validation.
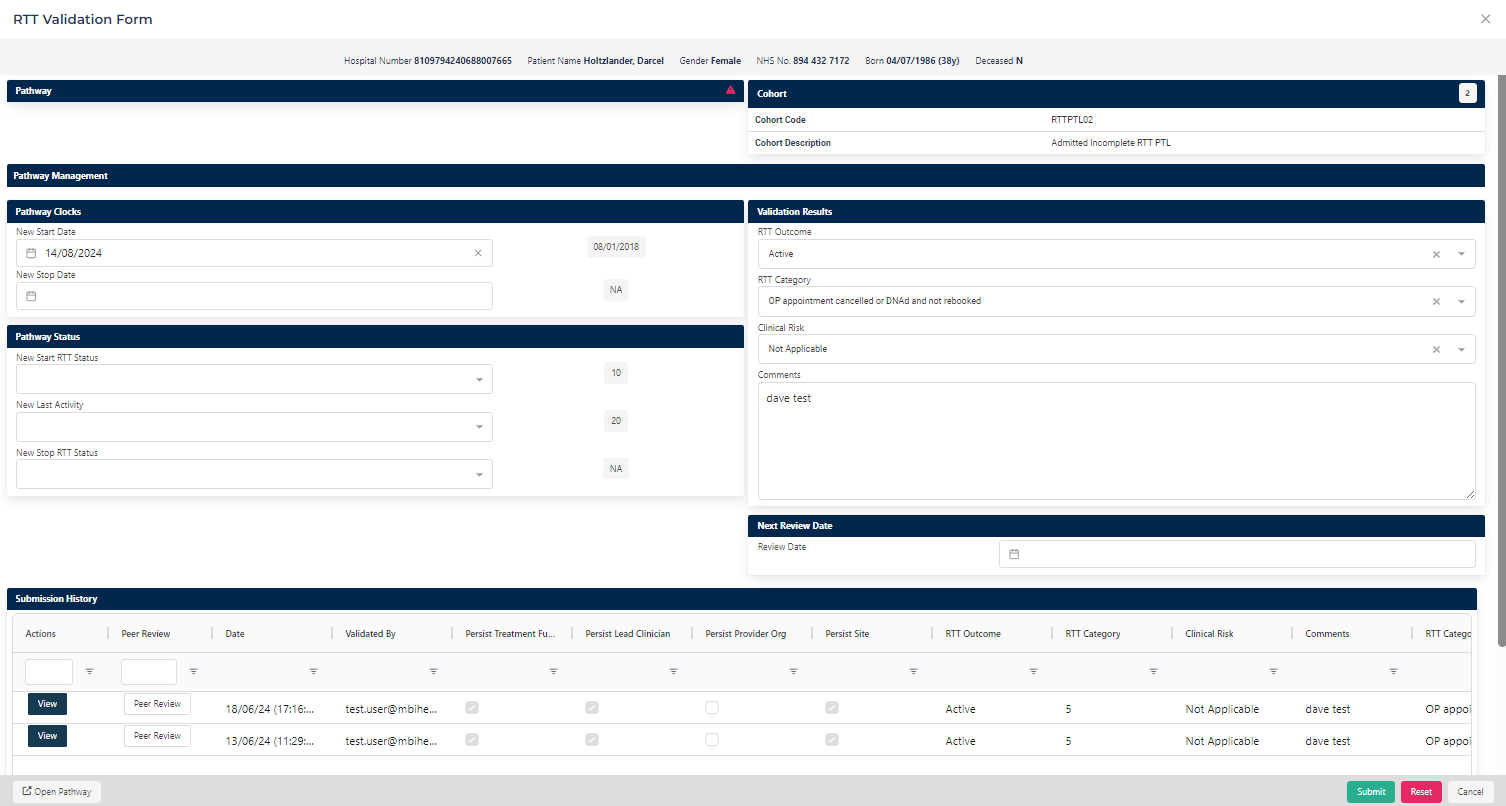
The Validation Form is split into several different panels:
Patient Panel
The Patient panel contains basic demographic information about the patient (Hospital Number, full name, gender, NHS number, date of birth).
Pathway and Cohort Panels
The Pathway and Cohort panels contain basic information about the pathway being validated (the Cohort from which it was selected, the unique Pathway ID from the Trust Patient Administration System, the most recent Treatment Function on the pathway, and details of the last Validation if it has already been validated).
Pathway Clocks Panel
The Pathway Clocks panel shows the current Clock Start, Clock Stop, and (if present) latest Restart dates for the pathway, to the left of the text boxes. The dates in the Current column are those which were present on the Trust Patient Administration System on the Census Date. These will only be updated if the data is altered in the source system.
It is not mandatory to complete this section, but these dates can be entered into LUNA Pathfinder either by completing the text boxes by typing in the format shown (DD/MM/YYYY), or by selecting dates from the calendars which pop up when you click in the text boxes. To clear the current Stop date from LUNA Pathfinder, click on the X icon on the right-hand side of the box.
Note: this will only record the dates on LUNA Pathfinder and will not update the Trust Patient Administration System.
Pathway Status Panel
The Pathway Status panel shows the national Referral to Treatment (RTT) codes associated with the Clock Start, Last Activity, and Clock Stop dates on the pathway. The codes on the right-hand side are those which were present on the Trust Patient Administration System on the Census Date. These will only be updated if the data is altered in the source system.
It is not mandatory to complete this section, but these codes can be entered into LUNA Pathfinder by selecting a new option from the associated dropdown menu.
Note: this will only record the codes in LUNA Pathfinder and will not update the Trust Patient Administration System.
Validation Results Panel
Record the outcome of validation in the Validation Results panel. This section is mandatory. LUNA Pathfinder will not allow the validation to be saved unless all fields are completed.
Use the RTT Outcome dropdown menu to record whether the patient is RTT Active (clock ticking) or Inactive (clock stopped or non-RTT pathway). Alternatively, Query can be selected. These are the default options, but they are completely configurable based on local validation procedure.
Use the RTT Category menu to record the outcome of your findings during validation, regarding the next activity on the pathway, or the next activity required (e.g. patient already has an appointment booked or requires activity to be scheduled). The options in the RTT category menu are restricted based on the RTT Outcome selected.
if the Clinical Risk dropdown menu is activated, use it to highlight at-risk patients identified during validation, in line with local procedure.
Record a summary of your findings in the Comments free text field.
Next Review Date Panel
The Next Review Date panel can be used to flag a record for further validation and review on a certain date in the future. This can be used later to filter Worklists to show records which were flagged for review by a certain date.
It is not mandatory to assign a review date, but this date can be entered into LUNA Pathfinder either by typing the date in the format shown (DD/MM/YYYY), or by selecting the date from the pop-up calendar which appears when you click in the input box.
Submission History Grid
The Submission History grid at the bottom of the form contains a row for each unique validation which has been saved on LUNA Pathfinder for the selected pathway. Each row contains the information recorded in the form when the validation was conducted, along with the username of the user who validated the record and the date on which the validation was saved.
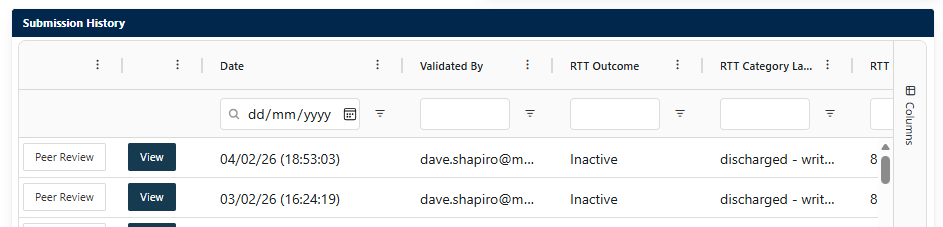
Managers and Supervisors will use this view to access the Peer Review function (the Peer Review button to the left of each row). Only certain User Roles have the access to conduct a Peer Review; these icons will not be visible to all users.
Each row also contains a View button, which will open the historic validation form with the details of that validation pre-filled. When viewing a historic validation, the New Form button will be visible in the footer, which, when clicked, will load a new form.
Peer Review
The Peer Review function allows for review of previously conducted validations on the system.
In the Submission History Grid, click the RTT Peer Review button to the left of the row to open the Peer Review panel.
Select whether the validation was correct by clicking either the Pass or Fail button.
Record any free text comments to support your findings in the comments field. This field is mandatory.
Click the Submit button in the peer review section to save the Peer Review and trigger an email notification for the validator.
Finalising a Validation
Click Submit to save the validation onto LUNA Pathfinder.
Click Cancel to discard the validation and return to the Worklist view (or click on the cross icon at the top-right of the Validation Modal).
Click Reset to clear all fields in the form.
Search Other Cohorts (beta)
Click the Search Other Cohorts button to display a grid showing other pathways associated with the patient.
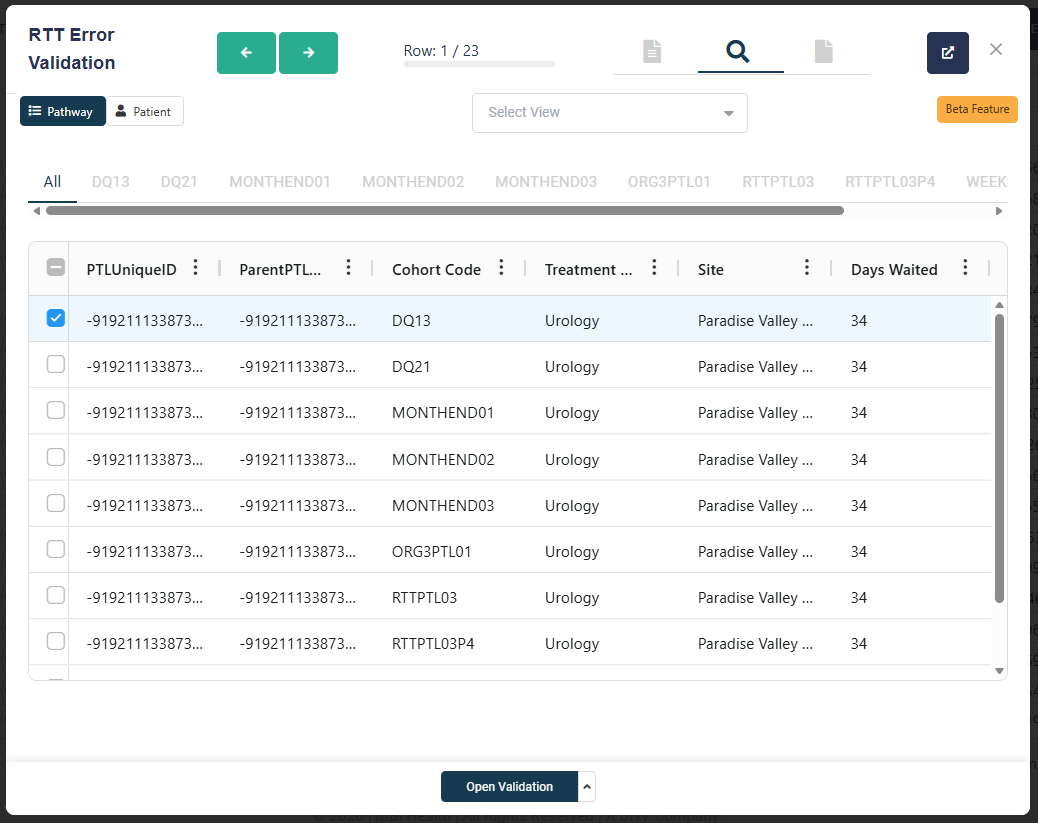
Use the Pathway and Patient buttons to toggle between pathway and patient search:
- The Pathway button will search by PTLUniqueID.
- The Patient button will search by Local Patient ID (MRN).
Results can be filtered by Cohort using the tabs at the top of the grid.
You can also filter the results by View by selecting a view from the dropdown menu.
Notifications
Notifications are used to inform users of important information regarding the system, their account, or actions they need to take. They are updated in real time.
There are several types of notifications available in LUNA Pathfinder:
Info Notifications
Info notifications can be viewed by clicking the notifications button. A pulsating red dot will appear on the button when there are new notifications.
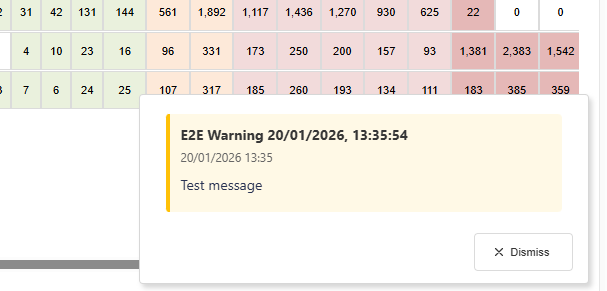
Warning Notifications
Warning notifications will appear as a toast popup at the bottom right of the screen. These can be dismissed by the user.
Danger Notifications
Danger notifications will appear as a modal overlay. These can be dismissed by the user by clicking the Acknowledge button.

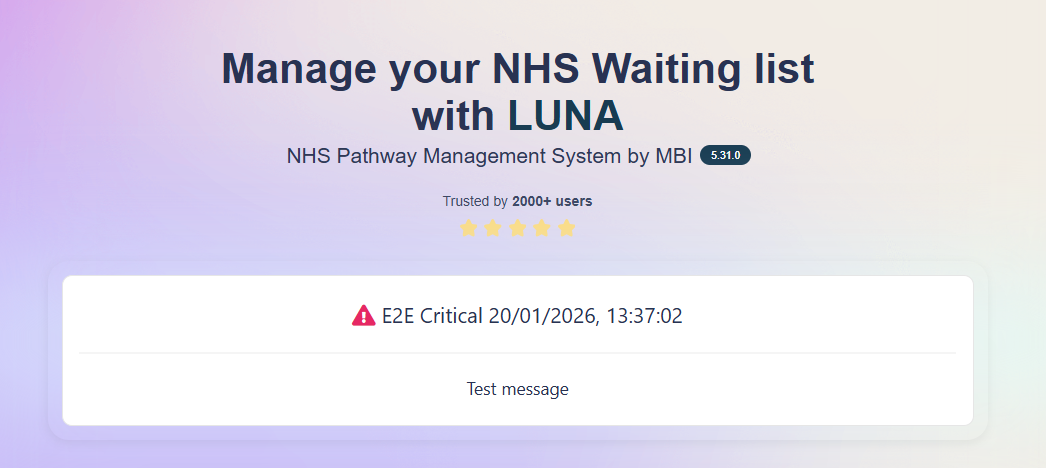
Critical Notifications
Critical notifications will redirect to the landing page and block access for non-admin users.
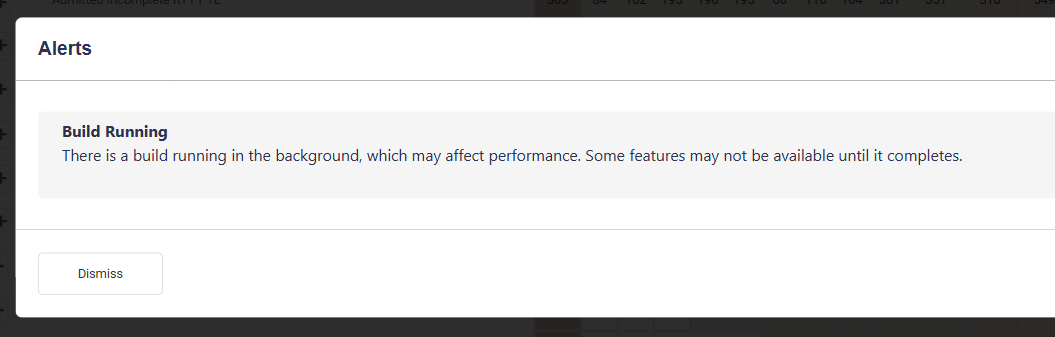
Build Notifications
When certain resource-intensive operations are in progress, build notifications are automatically displayed. They also inform the user if a build is running late. Additionally, the Surveyor links in the Worklist will be disabled for non-admin users during this time.
Upgrade Notifications
When an upgrade is in progress, upgrade notifications are automatically displayed. They also inform the user if an upgrade is running late. Additionally, the Surveyor links in the Worklist will be disabled for non-admin users during this time.
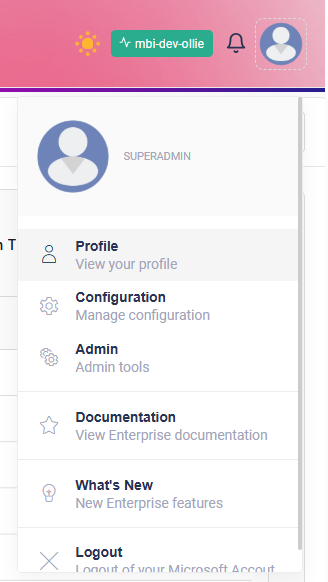
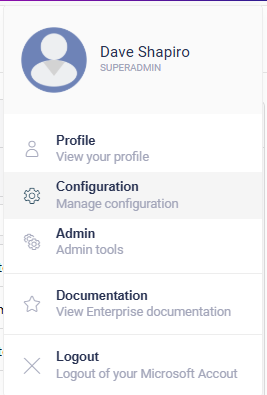
Profile Section
You can access this section by selecting the Profile option on the Profile menu.
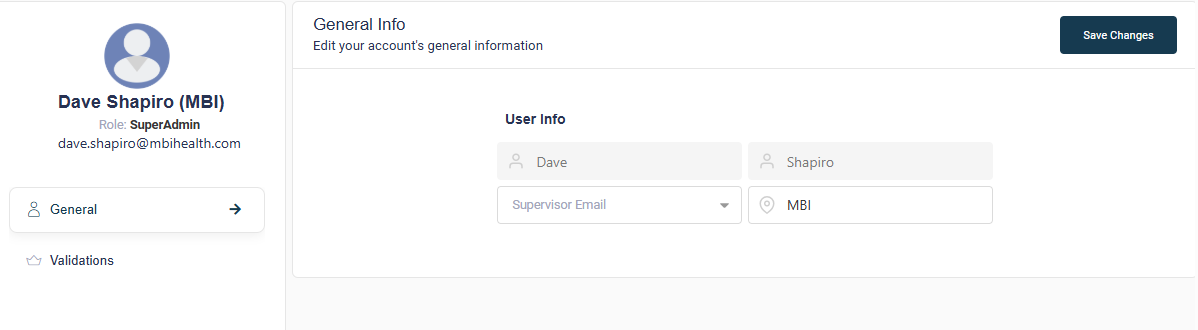
General
On this page you can view and edit your user information.
Validations Manager
This page displays a summary of validation activity on LUNA Pathfinder.
Validators can view their own validation history, while Managers can view the validation history of all their validators.
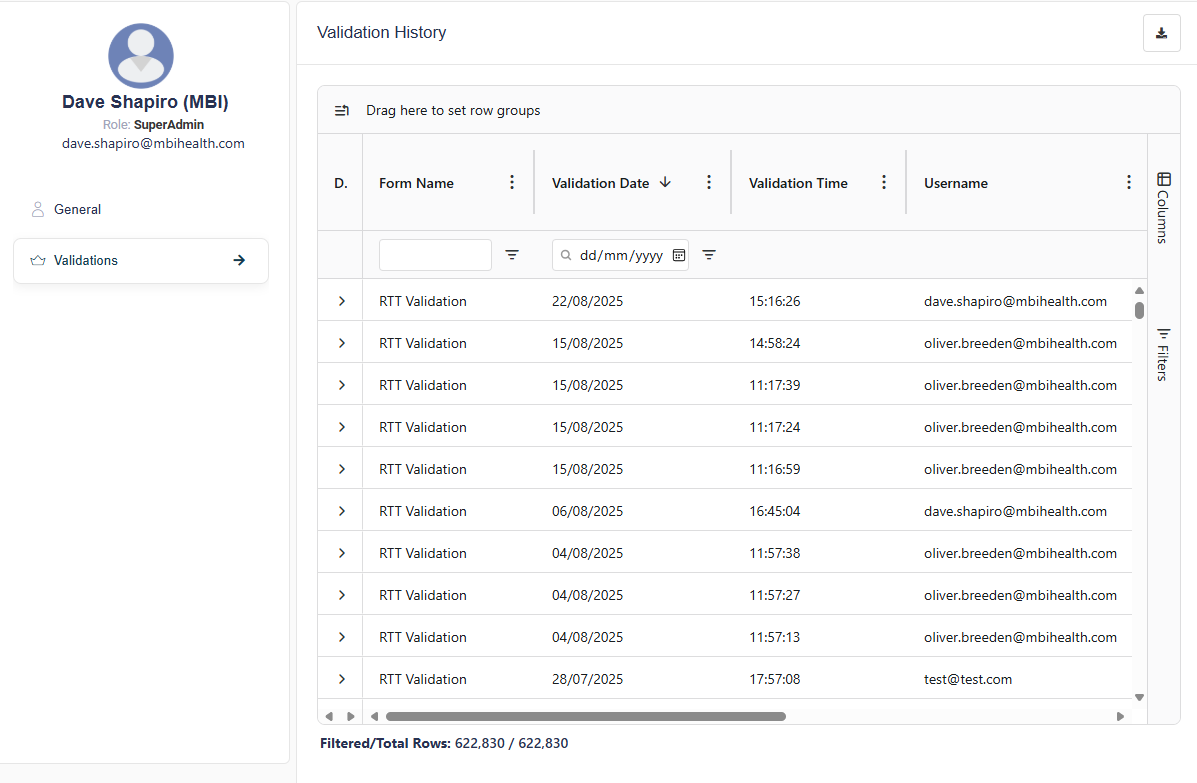
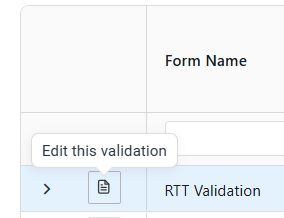
Click the expand arrow at the left of the row to view form data and form meta details about a specific validation.
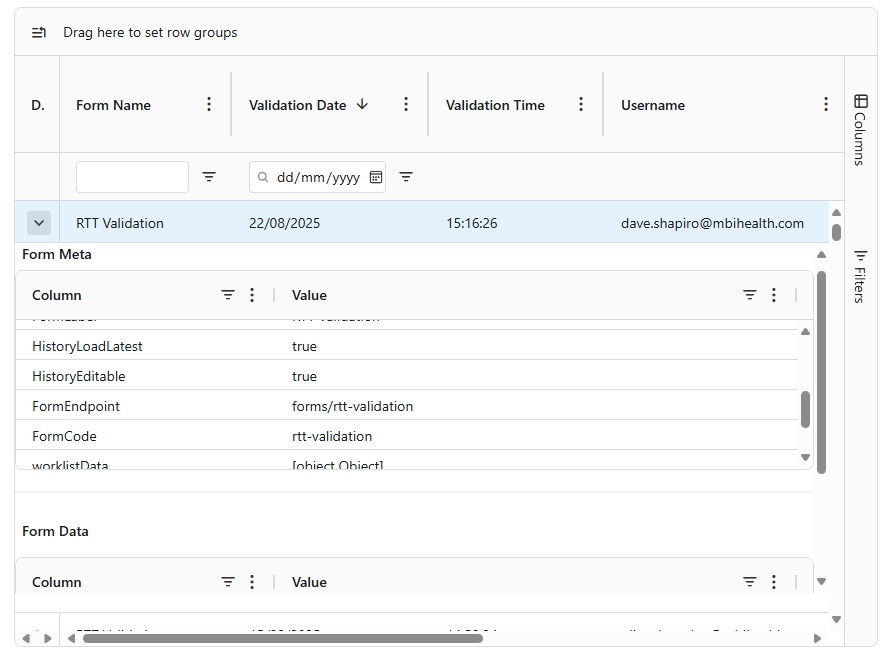
To resubmit a validation, click the Edit Validation button on the left of the row to open the validation form.
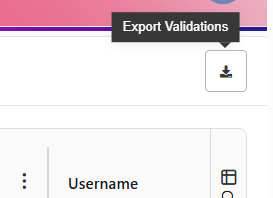
You can export the validation data to a CSV file by clicking the Export button.
NOTE: this is limited to 100,000 rows. If you attempt to export more than this, a warning will be displayed. To keep within the limit, you can apply filters to the grid columns, eg Validation Date, to reduce the number of rows exported.
Shared Worklists Manager
This page is available to Supervisors and above. It allows you to view and manage all shared worklists in a filterable grid.
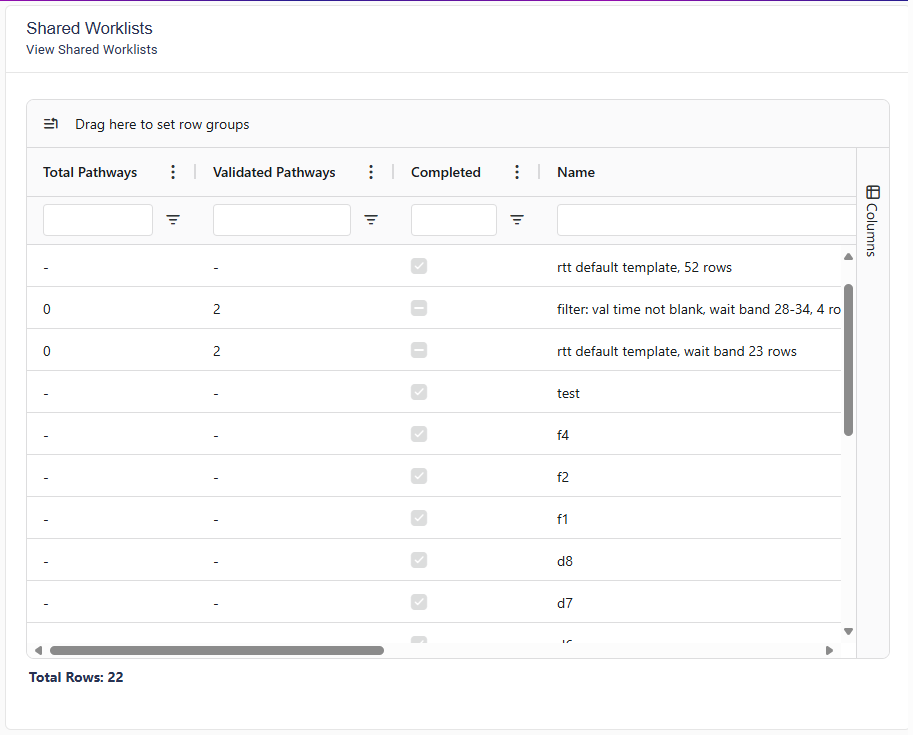
The grid displays key information for each worklist, including the users and teams it has been shared with. These columns can be filtered to quickly find a specific worklist.
To edit, reshare, or delete a worklist, double-click any row in the grid to open the Edit Worklist modal for that worklist.
Configuration Section (Managers and above only)
Select the Configuration option on the Profile menu to navigate to the Configuration section.
Users
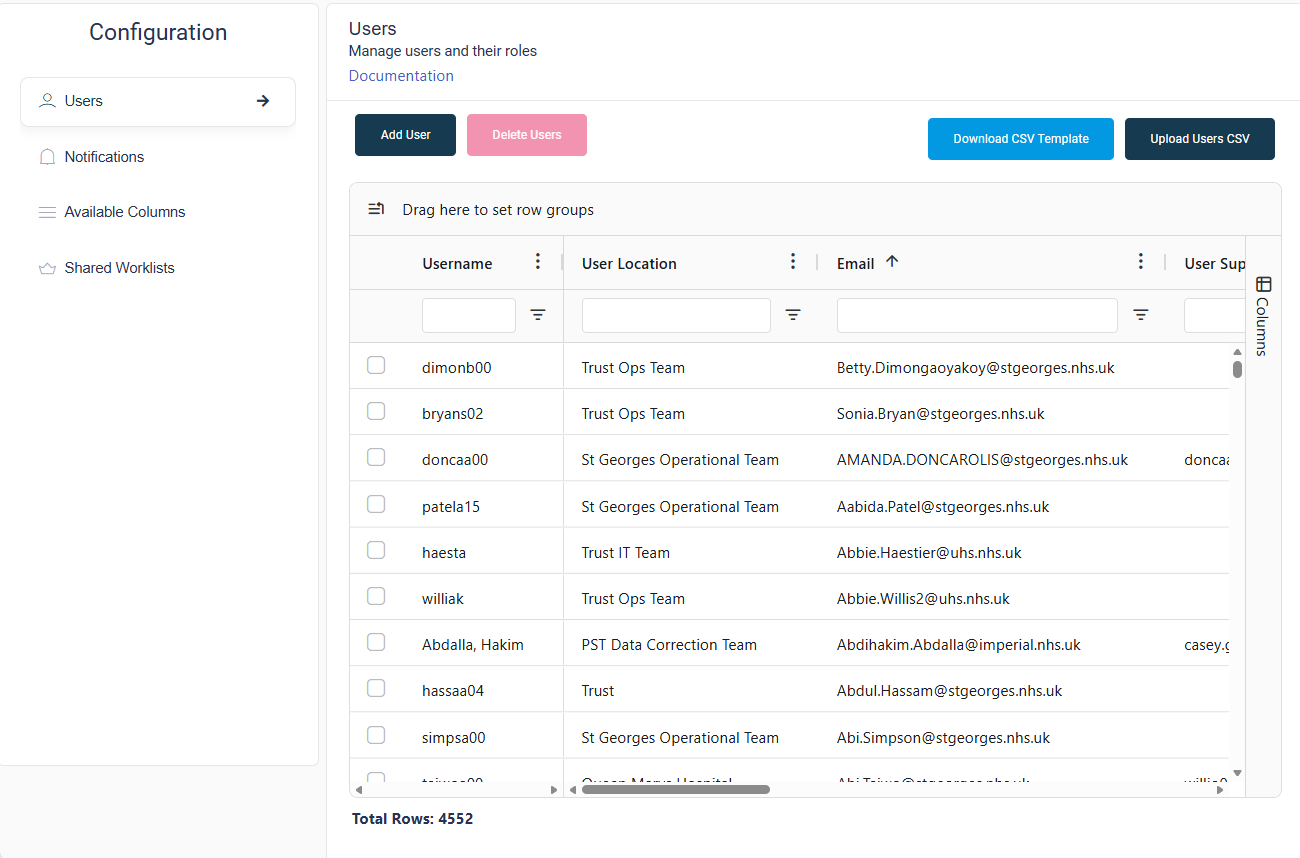
On this page, you can view information on all pathfinder users, add new users to the system, and manage existing users.
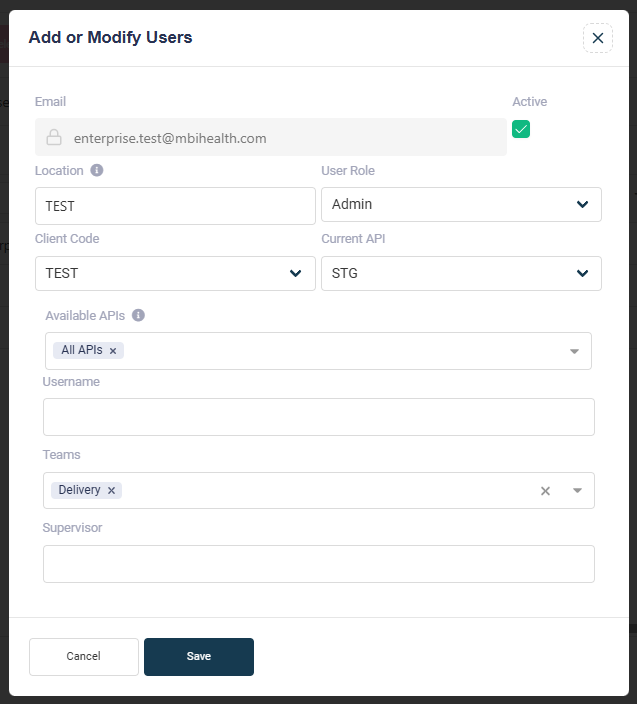
Adding or Editing a User
- Click the Add User button or double-click a row in the user grid to open a modal, where you can add a new user, or edit an existing user's details.
- Select the Active checkbox if you want the user to be active on the system.
- The Location field should be filled in with the user's team, eg Validation or Ops Team.
- The user can be added to one or more Teams by selecting them from the dropdown menu. To create a new team, just type the name into the Teams input field.
- The user's Username and Supervisor can optionally be set using the respective dropdown menus.
- Click Save to add the user.
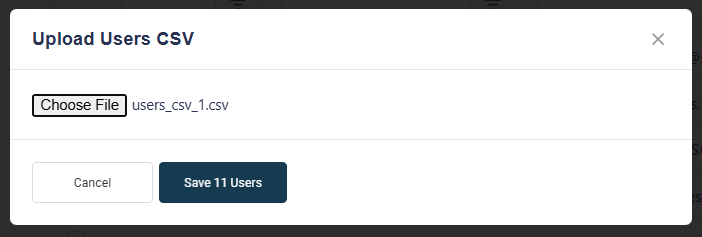
Adding Multiple Users via CSV Upload
Multiple users can be added to the system by uploading a CSV file.
- You can download a template CSV file by clicking the Download CSV Template button. This file contains the necessary columns and a sample row.
- Click the Upload Users CSV button to open a modal where you can upload a CSV file containing multiple users.
Deleting a User
- Select a user by clicking the checkbox on the left of the user's row in the grid. Multiple users can be selected.
- Then click the Delete button to delete the selected users.
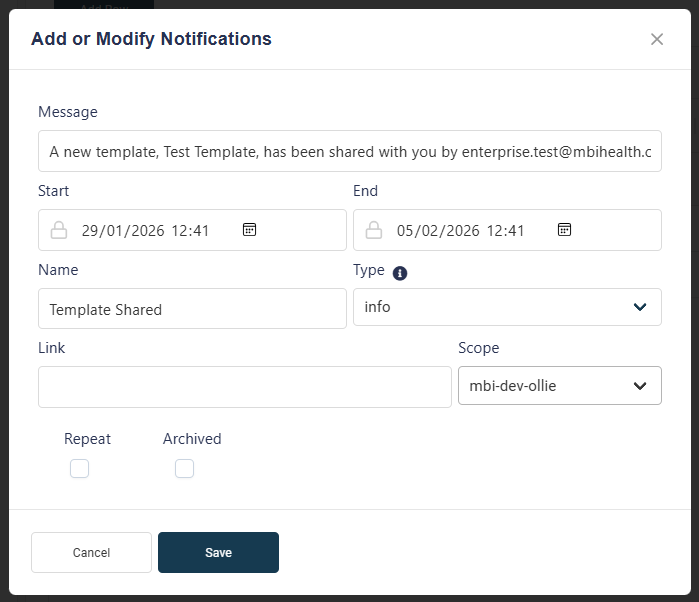
Notifications Management
This page allows you to view and manage notifications.

Note: The notifications grid will be filtered to show only active notifications by default. You can change the grid filters if desired to view archived notifications, or notifications with an end date in the past.
- To add a new notification, click the Add Notification button.
- To edit an existing notification, double-click on a row in the notifications grid.
- Enter or modify the notification details in the modal that appears, then click Save.
Available Columns
The Available Columns page allows you to view and configure the columns available in the Worklist, Pivot Table and global filters.
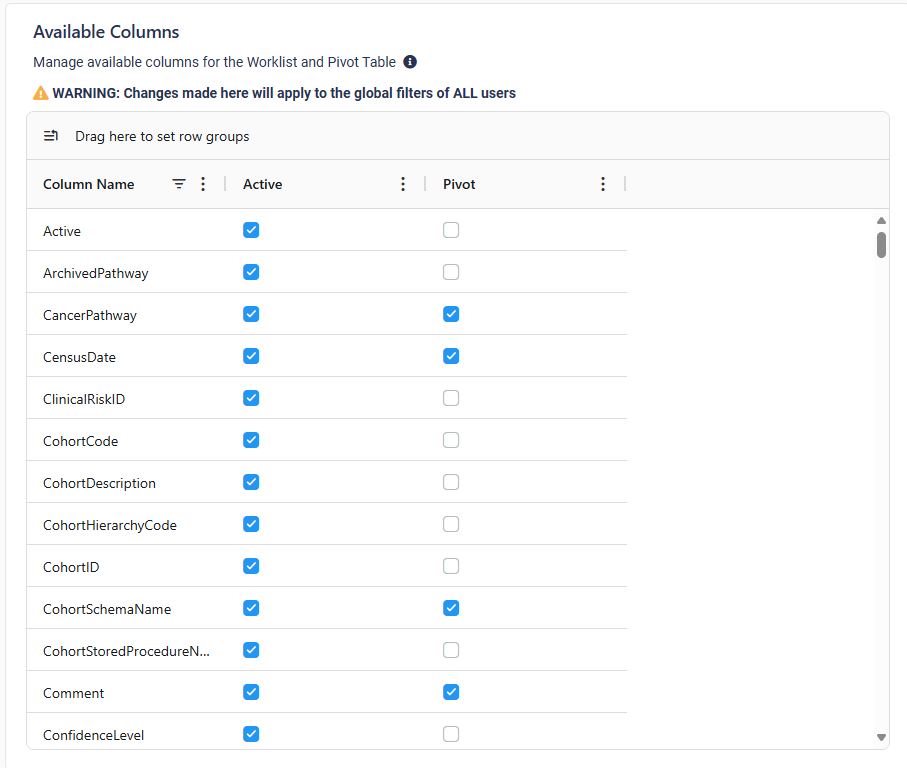
- The Active checkbox indicates whether the column is available in the worklist and global filters.
- The Pivot checkbox indicates whether the column is also available in the pivot table.
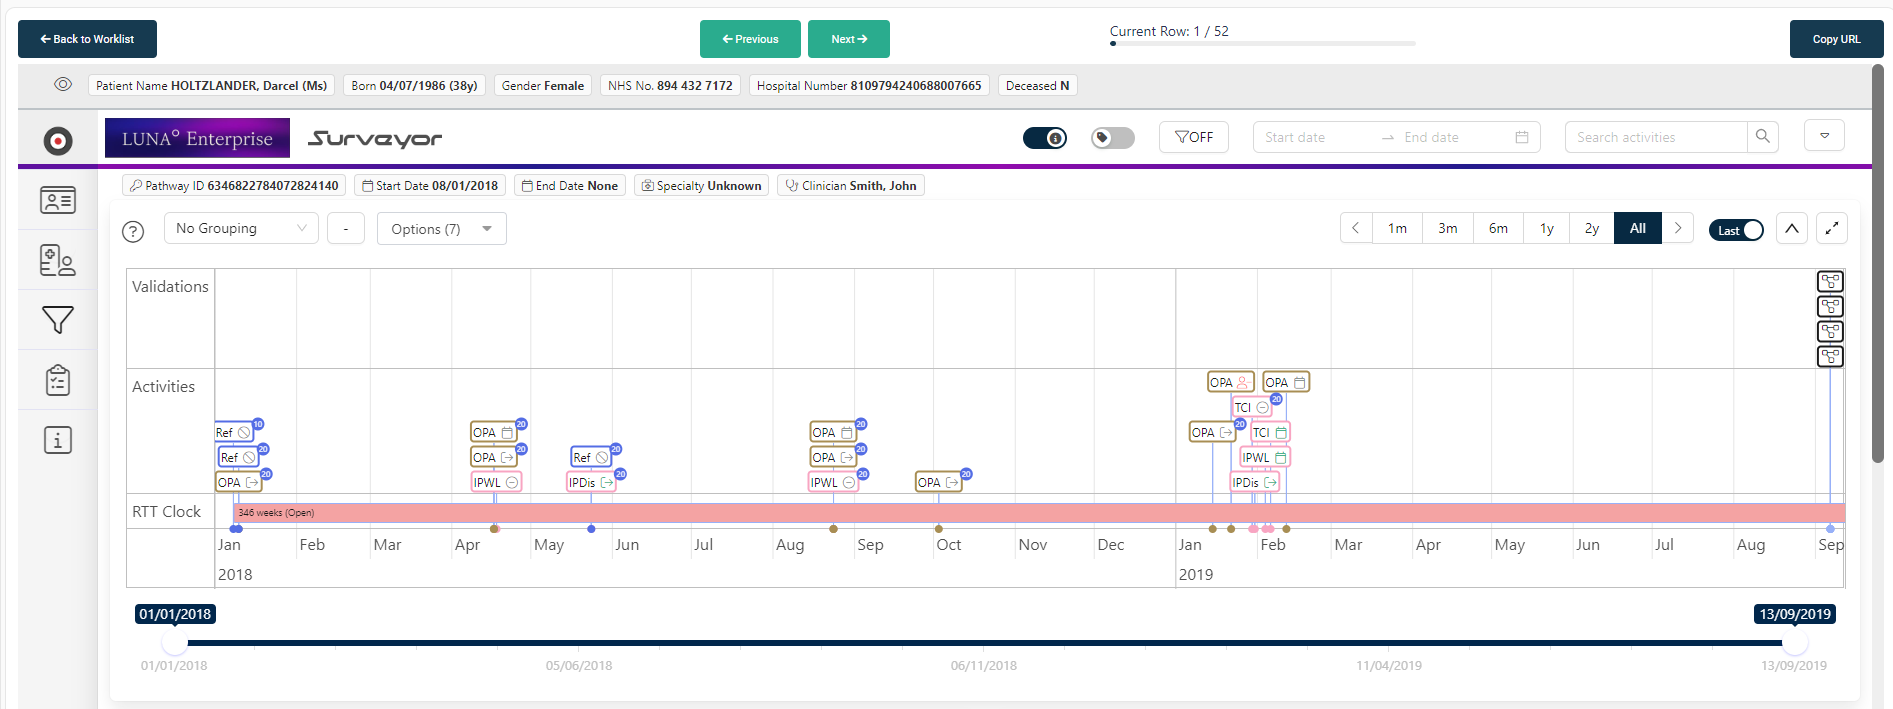
Navigating LUNA Surveyor
LUNA Surveyor displays the patient’s full pathway and each activity or contact point along the way.
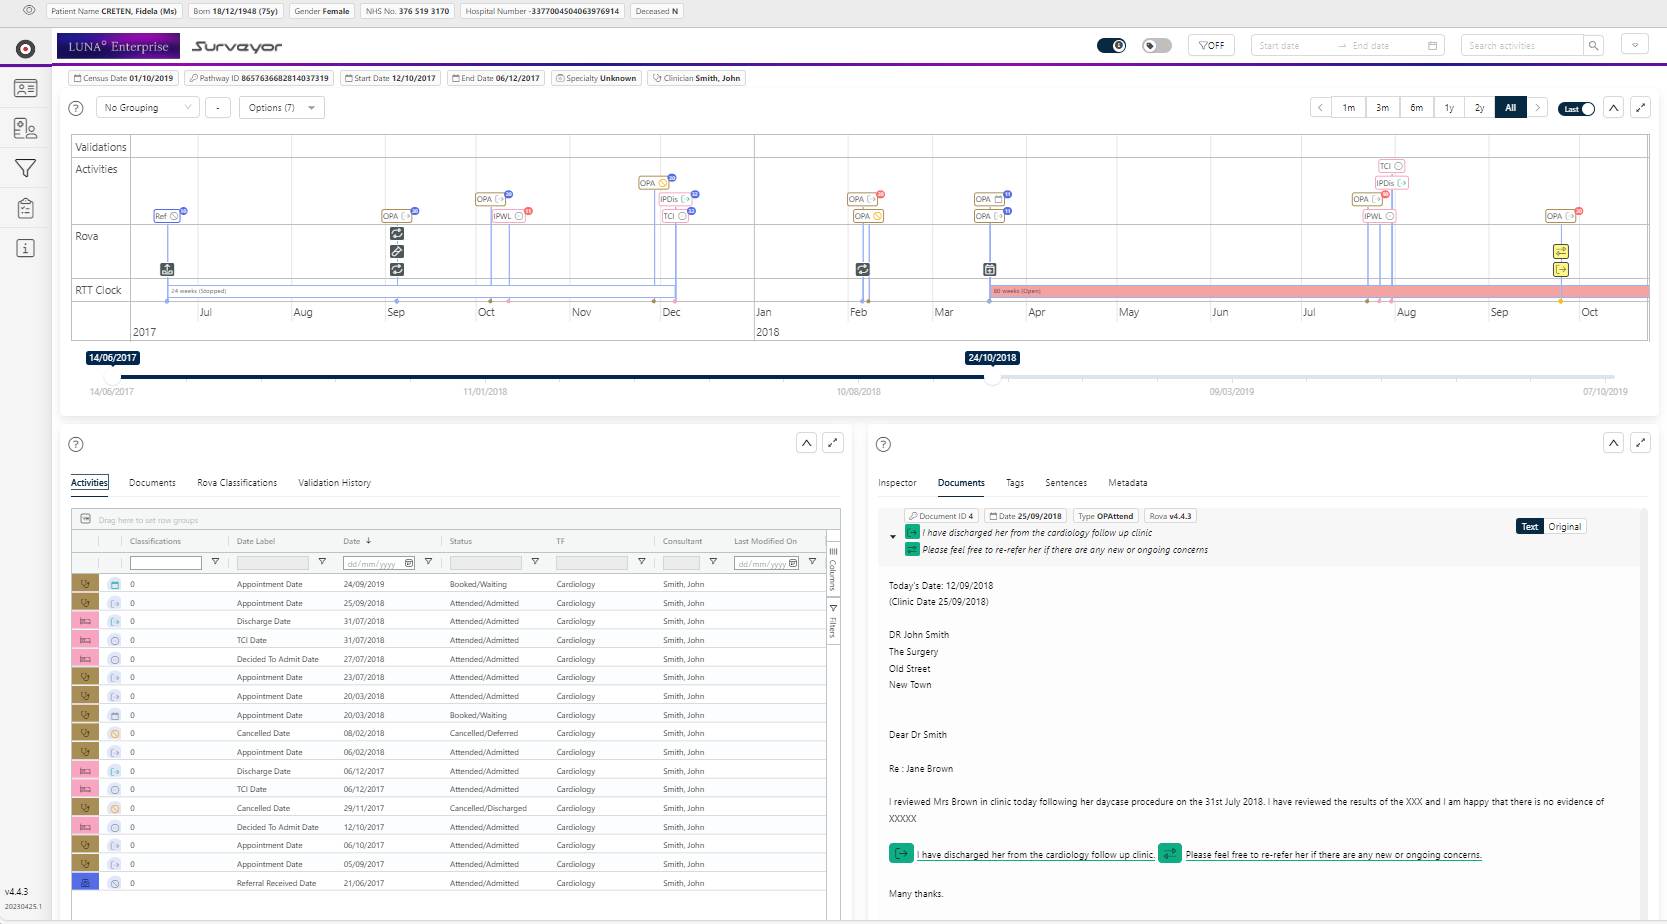
The Patient Info Panel displays basic demographic information about the patient.

This can be blurred by clicking the 'Eye' icon to the left of the panel.

The Pathway Info Panel displays information about the current pathway.

Surveyor is divided into three main sections:
The Timeline displays the patient's pathway in a visual format.
The Details section displays granular information about activities, documents, Rova Classifications, and Validation History.
The Document Viewer shows all document analysis provided by Rova.
Timeline
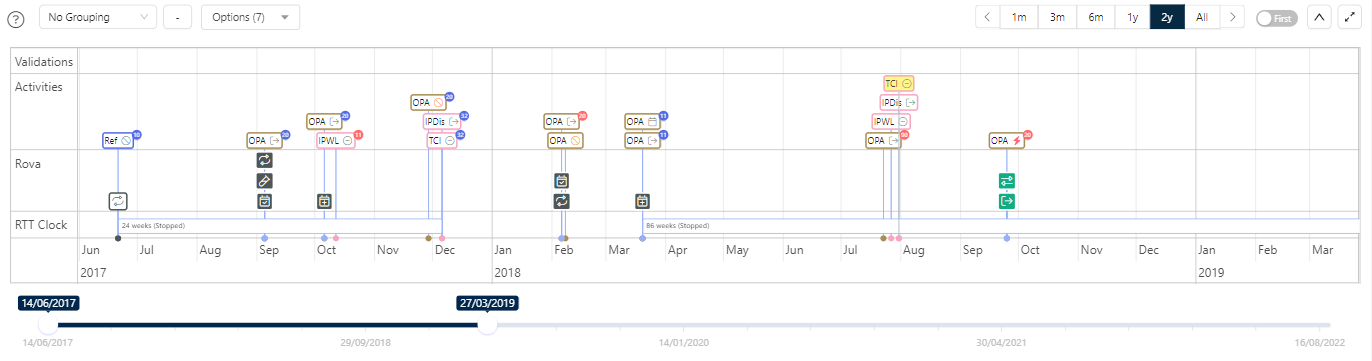
The Timeline displays all the items in the patient’s pathway in a visual format. Items are grouped in swimlanes according to their type.
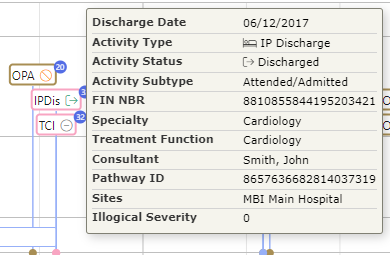
If you hover over an item, a tooltip will display the item's detailed information.
When an item is clicked, the corresponding row or rows will be highlighted in the relevant Details section grids.

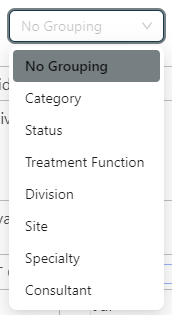
A grouping menu allows you to group items by different criteria.
An order button allows you to order the swimlanes in ascending or descending alphabetical order.

Timeline Options Menu
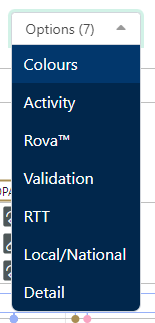
Activity, Rova, validation and RTT Swimlanes can be toggled on or off by means of the Timeline Options menu.
This menu also has the following options:
- Colours: toggles the colour-coding of timeline items.
- Local/National: toggles between displaying Local or National RTT status codes.
- Detail: toggles the level of detail displayed.
Zoom controls allow you to control the length of the time period displayed. This can also be adjusted manually by using the date slider at the bottom of the timeline.

Timeline Detail
The level of detail displayed in the timeline can be toggled in the Timeline Options menu. This feature is particularly useful when viewing a pathway with a large number of items.
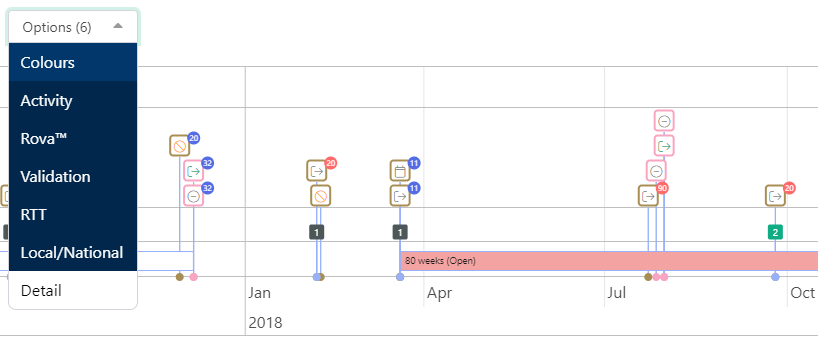
When the detail is turned off:
- The activity items do not display the abbreviated activity type. They can still be identified by the colour of the border and the icon.
- The Rova Classification items do not display an icon. They can still be identified by their background colour. They are also grouped per document, and sub-divided by parent category.
Timeline Item Types
Activity Items

Each activity is displayed with a coloured border and an icon to represent the activity type.
The RTT Status Code is displayed in the top right of each activity item. This is coloured red if it is illogical, or blue if it is logical.
Rova Classification Items

These items are displayed with a coloured background. The background colour represents the parent category of the classification, and the icon represents the classification itself.
Validation Items

Each validation in the validation history of the pathway is displayed as a separate item in the timeline.
RTT Items
RTT Clock items are displayed in their own swimlane. They are coloured according to their status:
- White for stopped
- Green background if duration is 126 days or less
- Orange if duration is 127 to 364 days
- Red if duration is over 364 days

Details Section
This section provides detailed information about each item in the patient’s pathway. There are four tabs in this section:
Activities
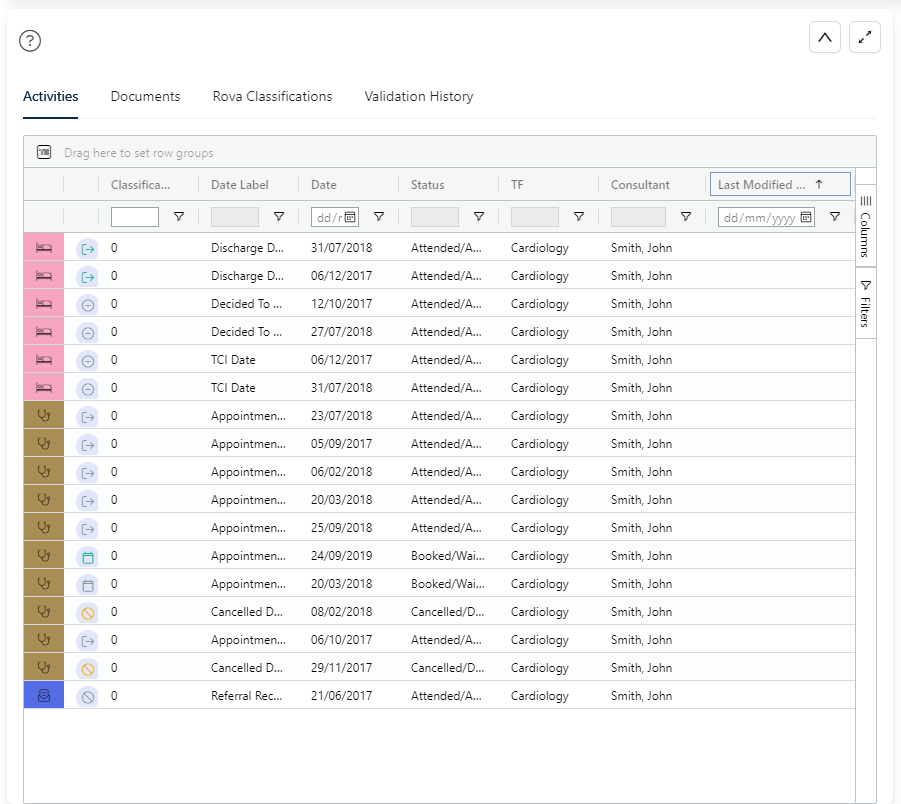
The Activities grid displays all activities on the pathway. Use this view when viewing multiple activities, and where filtering & ordering needs to be applied to the list.
Documents
The Documents grid displays any related documents processed and categorised by Rova. Use this view to review how Rova has classified documents.
Click the arrow icon to the left of each row to view the document's related Rova classifications.

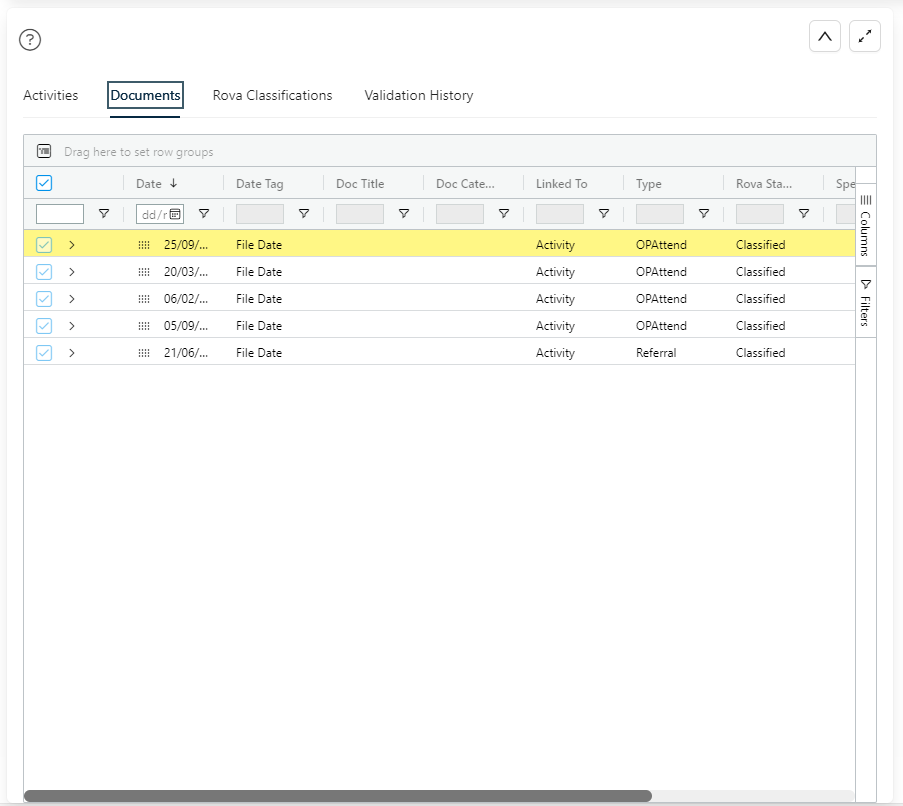
Rova Classifications
This grid displays detailed information on all Rova classifications in the pathway.
Validation History
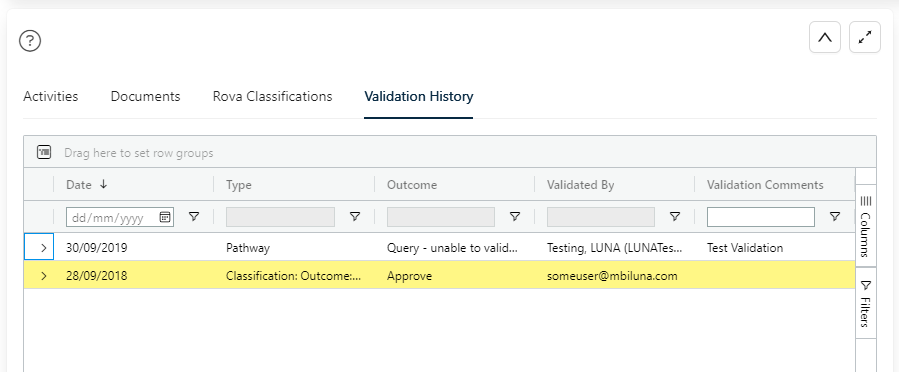
This grid displays detailed information on all validations in the pathway.
Document Viewer
This section provides detailed information about each document in the patient’s pathway. There are four tabs in this section:
Inspector
The first tab in the document review section shows highly detailed information about a selected item in the pathway. If a document or Rova Classification has been selected, it will show the key information about the document that has been generated by LUNA Rova.
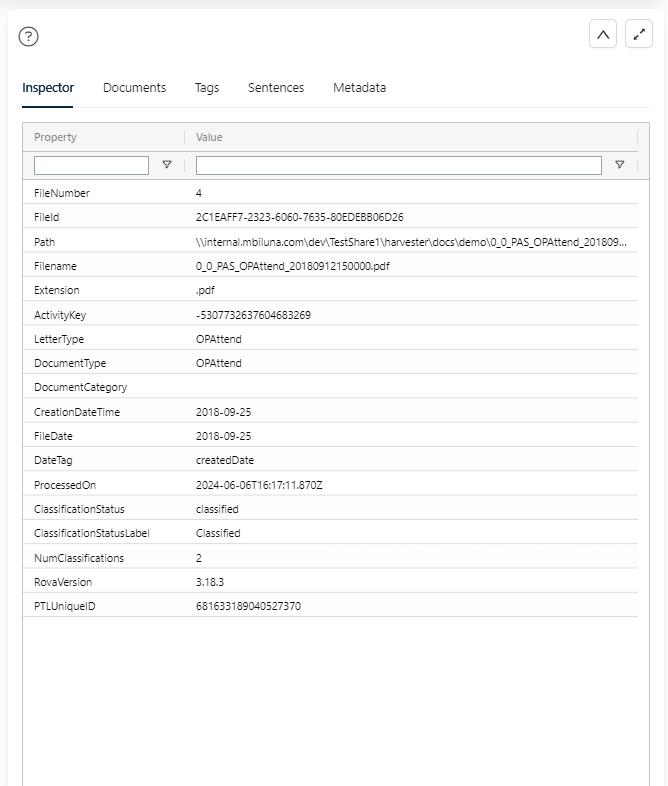
If an activity has been selected, it will show the key information about the activity.
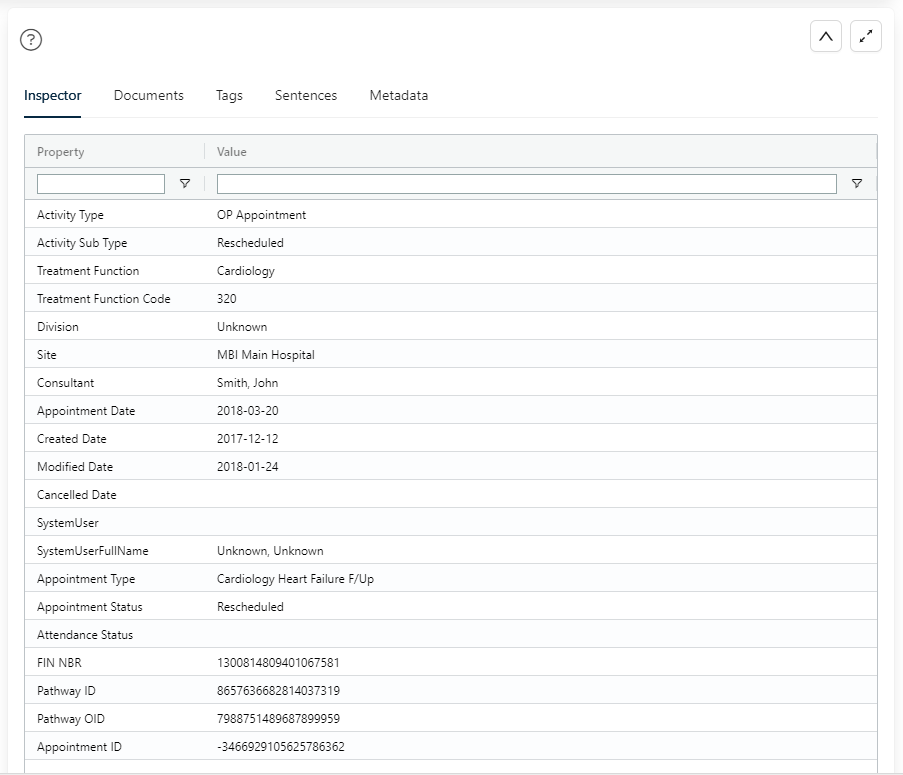
This section will be used by advanced users and system administrators.
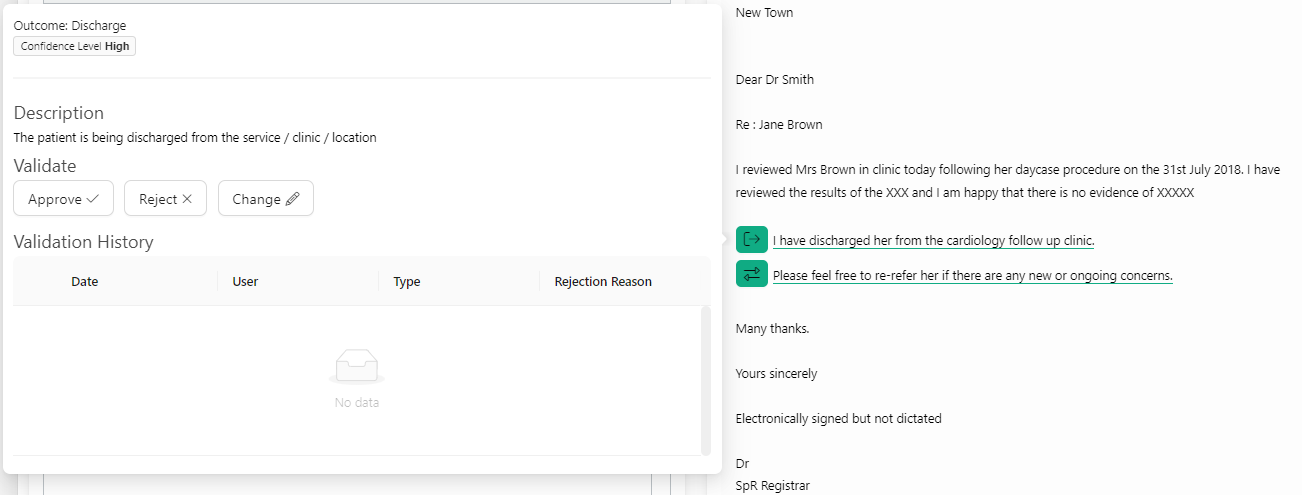
Documents Reader
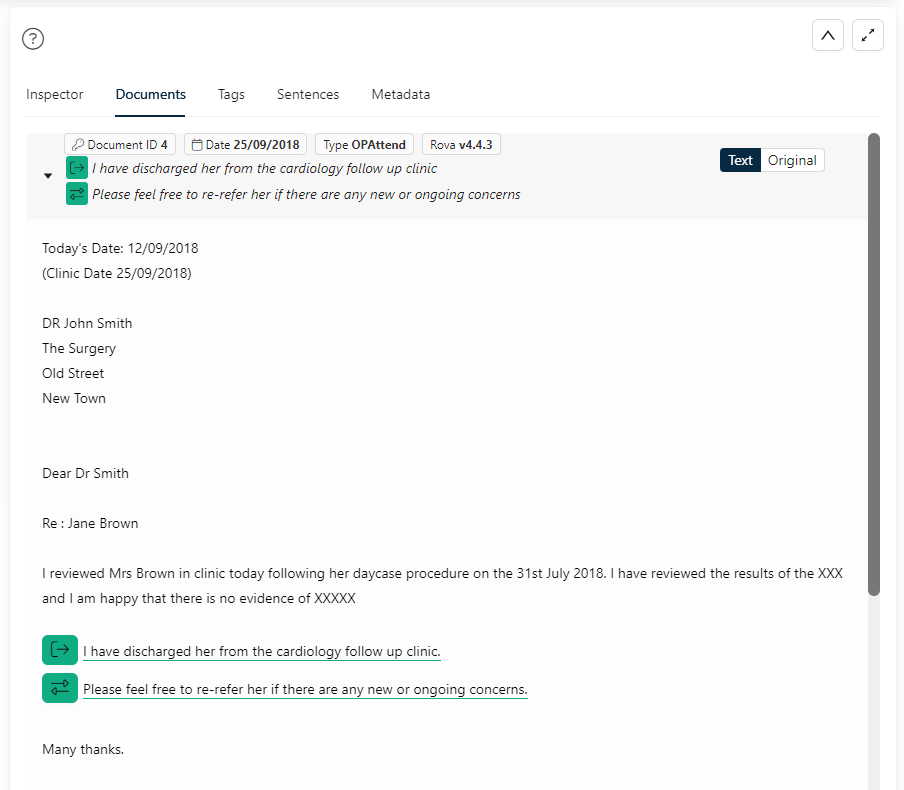
The Documents tab shows the analysis of the document by LUNA Rova. Rova automatically reads clinical documents and highlights the key information that is used to categorise the letter. In the example above, Rova has highlighted dates, the specialty, and the key sentences which categorise the outcome of this example letter as Discharge and Discharge with re-referral.
Use this view to conduct human validation, if necessary, to correct the pathway and improve Rova’s learning in similar scenarios.
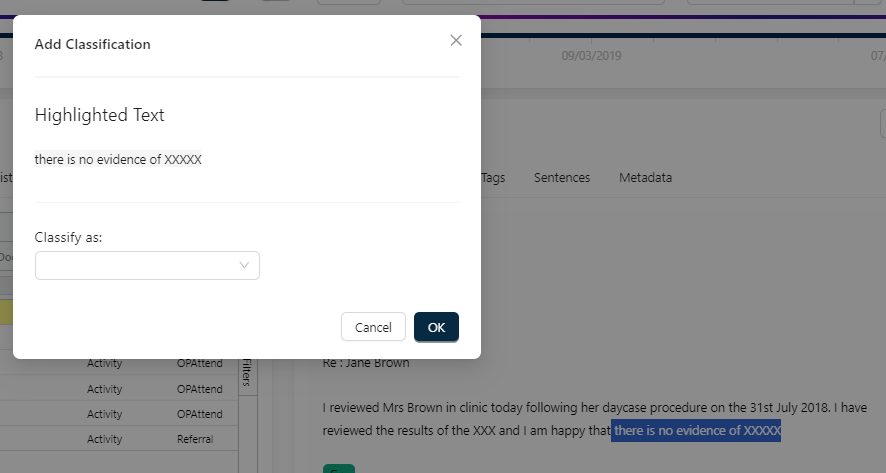
To add a new classification, highlight a sentence in the document and right-click to bring up the Add Classification modal. Select the appropriate classification from the dropdown menu and click OK.
Editing Classifications
To approve, reject or change a classification, hover over the classification icon in the document and select the appropriate option from the classification popover.
The comments field in the reject classification modal is required if the rejection reason selected is 'Other'.

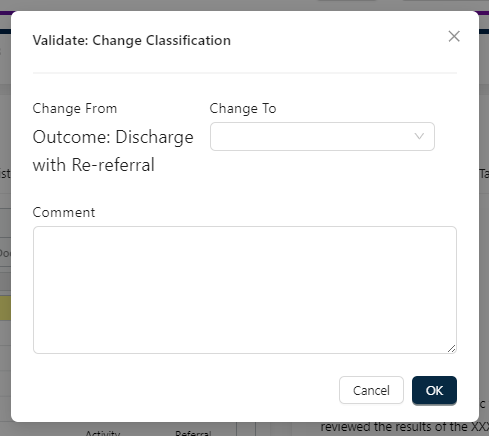
Once a change is made, when a similar sentence is found in another document, Rova will correctly classify it without user input.
Tags
This tab shows any tags identified by Rova in the letter which are used to organise documents in a structured way for further patient insights.
Sentences
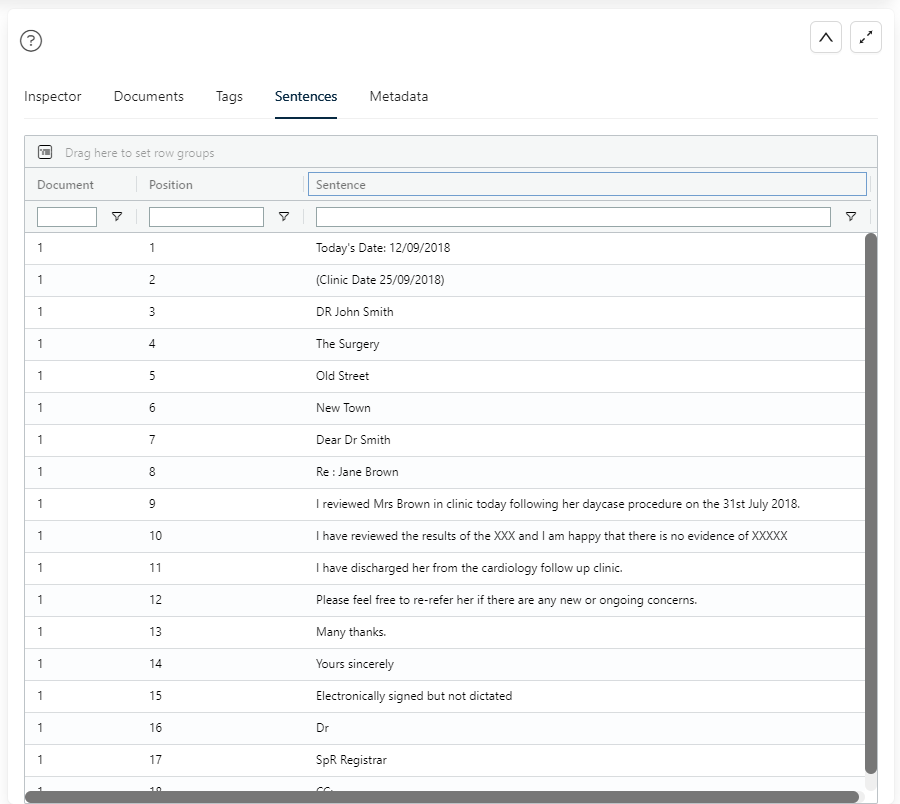
This tab displays a list of individual sentences used by Rova for analysis of the document.
Metadata
The Metadata tab shows a range of data types that can be extracted from a letter for further classification at a later stage, with the corresponding information found in the letter for each.
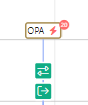
Illogical Sequence Identifier
With LUNA Rova integrated, LUNA Surveyor will highlight any illogical sequences in a patient’s pathway. The example below shows a conflict between a clinic letter outcome and the current RTT status of a patient. To see what information has been used by LUNA Rova to inform the decision, click on the item in the timeline and it will be highlighted in the relevant grid below.
Patient Master Records Table
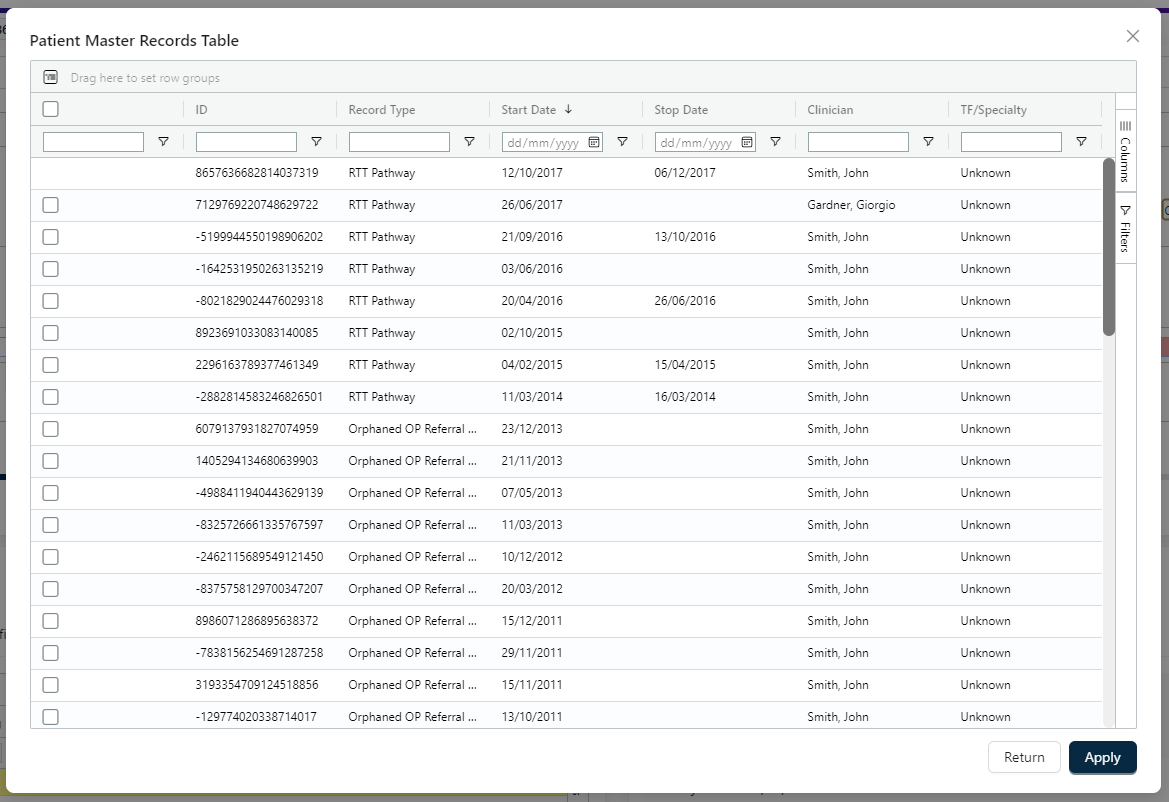
The Patient Master Records table displays all the patient’s pathways in a tabular format. Multiple pathways can be displayed simultaneously in Surveyor.
Select a row in the table by clicking the checkbox to the left of the row.
Note: the primary pathway that Surveyor is opened with cannot be deselected.
When you have made your selections, click 'Apply' to update Surveyor with the additional pathways.
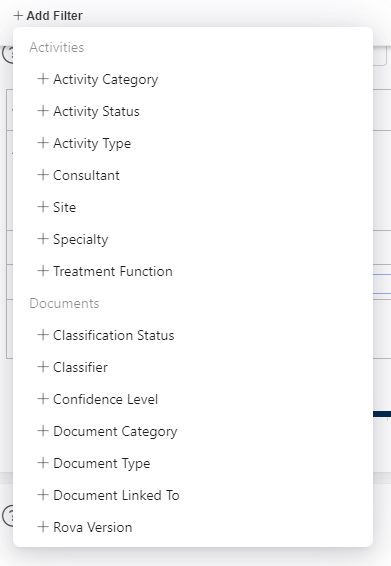
Timeline Filters
Surveyor provides a range of filters to help you focus on the information you need. Click the Filters button to open the Filters panel.

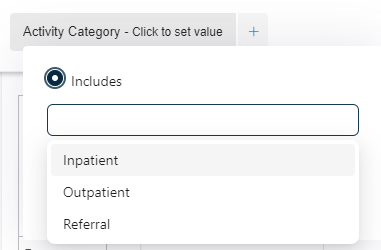
Hover over 'Add Filter' and select the filter you wish to apply from the menu that appears.
Click the filter tag that appears in the Filters panel, then select 'Includes' or 'Excludes'.
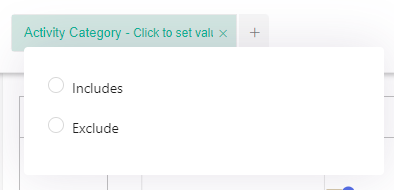
Click in the input field, then select one or more options from the dropdown menu that appears.
The Timeline and the Details Section grids will update to show only the items that match the filter criteria.
Additional Activity Filters
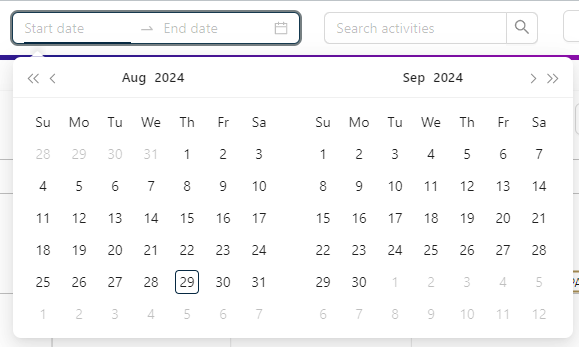
In addition to the main Filters menu, Activity items can be filtered via the Date Filter.
Activity items can also be filtered via the Activity Search bar.
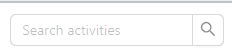
This will filter the activities displayed in the timeline and activities grid as you type, to only show those which match the search term.
Tooltips Switch

Tooltips are provided to give you more information about the items in Surveyor.
The Tooltips switch allows you to toggle the display of tooltips on these items.
Copy Tag Label Switch
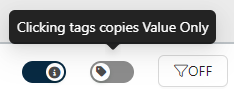
All tags displayed in Surveyor (including those in the Document Viewer) can be copied to the clipboard by clicking on them. The Copy Tag Label switch allows you to switch between copying the tag's label and value, and copying the value only.
Reporting
To manipulate and analyse large numbers of records or live data, Excel can be used for reporting purposes, using an API or SQL connection to the underlying data.
For example, live Excel reports can be used instead of exporting a Worklist to a spreadsheet where you can set the spreadsheet to update every time you open it instead of a static csv file (see the Export CSV option for further details).
Managing live reports in Excel also allows for the use of more advanced analysis of the data (e.g. Pivot Tables) for reporting purposes.
To access and set up live reports in Excel, users must be granted access by a LUNA Pathfinder Manager.
Configuring Excel for Reporting
Data tab
To create a live report, open a blank Excel workbook and click on the Data tab.
From Other Sources
In the Get External Data section of the Ribbon, click From Other Sources.
From SQL Server
The From Other Sources dropdown menu will be displayed. Click From SQL Server.
The Data Connection Wizard pop-up window will be displayed.
Data Connection Wizard: Connect to Server
In the Server name field, enter the name of the server where the LUNA Pathfinder reports are stored.
The Log on credentials will default to Use Windows Authentication. Do not change this.
Click Next >.
The Select Database and Table screen of the Data Connection Wizard will be displayed.
Data Connection Wizard: Select Database
Use the dropdown menu to select the live LUNA Pathfinder database. If you do not know which option to select from this menu, contact a LUNA Pathfinder Manager or system administrator.
Once you have selected a database, the window will be populated with the different tables (reports) available.
Data Connection Wizard: Select Table
Select the report from the list. If you do not know which option to select from this list, contact a LUNA Pathfinder Manager or system administrator.
Click Finish.
The Save Data Connection File and Finish screen of the Data Connection Wizard will be displayed.
Data Connection Wizard: Save and Finish
Click Finish.
The Import Data pop-up window will be displayed.
Import Data
The first option will default to Table. Do not change this.
The second option defaults to Existing worksheet. To create the report on the worksheet which you currently have open, click on the top-left cell (A1) to highlight it, and click OK.
To create the report on a new worksheet (e.g. if you already have data on the active worksheet), click the New Worksheet radio button, then click OK.
The data will be loaded into a table in Excel. Depending on the number of records being loaded from LUNA Pathfinder, this may take a few seconds to display.
Excel Report
The columns in the Excel table will match the columns in the default Worklist Configuration for the selected data on LUNA Pathfinder.
The data being displayed in Excel is now a live feed from the LUNA Pathfinder database. If any changes are made to the data in LUNA Pathfinder (e.g. when the data is refreshed and built overnight), right-click anywhere on the spreadsheet table and select Refresh from the dropdown menu.
Refreshing Data
The data in Excel will be refreshed to match what is displayed in LUNA Pathfinder.
Appendix A: Glossary of Terms
| Term | Description |
|---|---|
| Build Date | The date that the database of pathway data was built on LUNA Pathfinder. Under normal circumstances, this will be today’s date, and the day after the Census Date. |
| Census Date | The date that the pathway data was extracted from the Trust’s Patient Administration System. Under normal circumstances, this will be yesterday’s date, and the day before the Build Date. |
| Cohort | A group of pathways created by logical processing of the data from the Trust’s Patient Administration System (e.g. Cerner Millennium, Lorenzo, etc.) |
| Cohort Pivot Grid | The main LUNA Pathfinder Dashboard which displays patient pathways grouped into Cohorts. |
| Dashboard | The high-level view of the Cohort Pivot Grid showing Cohorts and bands of weeks waited. |
| Peer Review | Recording the outcome of checking the accuracy of a validation on LUNA Pathfinder. |
| User Role | The level of access granted to a user account that governs the specific actions which the user can conduct on the system. |
| Validation | Recording the outcome of a validation on LUNA Pathfinder. This does not update the Trust’s Patient Administration System. |
| Validation History | A table of all validations conducted on a patient pathway. |
| View | A group of Cohorts which can be viewed on one page by selecting the View from the Select View dropdown menu. New Views can be configured by LUNA Pathfinder Managers and system administrators. |
| Worklist | A table of pathways displayed as individual rows. |
| Worklist Template | A configured set of columns used when displaying a Worklist from a certain View. |
Appendix B: System Requirements
The following are end-user system requirements for accessing and running the Pathfinder front-end:
| Requirement | Minimum | Recommended |
|---|---|---|
| Hardware | ||
| Processor | Dual Core 2.6 GHz | Quad Core 2.6GHz |
| Memory | 4GB DDR2 RAM | 16GB DDR2 RAM |
| Graphics | On board | On board |
| Operating System | ||
| Windows | Windows 10 | Windows 11 |
| Software | ||
| Browser | Microsoft Edge or Google Chrome | Microsoft Edge or Google Chrome |
| Internet Explorer is no longer supported | ||
| Spreadsheets | MS Excel | MS Excel |
| Monitors | ||
| Screen Resolution | 1366 x 768 | 1440 x 900 or higher |
| # of Screens | 1 | 2 |
| Network | ||
| Local Network Access | VPN | Virtual Desktop or Workstation on-site |
| Internet Access | Not Required | Not Required |
Appendix C: Known Issues
| Issue Ref | Page | Comment |
|---|
Version control
| Version | Date | Who | Amendment History |
|---|---|---|---|
| 1.0 | 06/09/2018 | Michael Squibbs | Final full User Guide published |
| 1.1 | 25/02/2019 | David Quincey | Updated to reflect design and interface upgrades |
| 2.0 | 04/03/2019 | David Quincey | Final updates applied and published |
| 3.0 | 11/04/2019 | David Quincey | Updated screenshots for new release |
| 4.0 | 15/07/2019 | David Quincey | Updated screenshots following testing |
| 5.0 | 01/11/2019 | David Quincey | Updated screenshots and functionality after grid and software upgrades |
| 5.1 | 01/12/2019 | David Quincey | Minor amendments to screenshots |
| 6.0 | 21/09/2020 | Oliver Breeden | Reviewed current document and updated with new Surveyor & Rova description |
| 7.0 | 17/01/2022 | James Meek | Revised formatting and updated |
| 8.0 | 14/09/2022 | James Meek | Browser requirements updated in line with IE retirement |
| 9.0 | 30/08/2024 | Dave Shapiro | Update screenshots for new Pathfinder |
| 9.1 | 02/09/2024 | Oliver Breeden | Minor improvements from general review |